Your home’s safety depends heavily on the condition of your circuit breakers. But how to test a circuit breaker Safely and be sure they’re functioning properly?
Learning how to test a Safely circuit breaker safely might seem intimidating, but with the right steps, it’s a task you can handle on your own. This guide will walk you through simple, effective methods to check your breakers without putting yourself at risk.
By taking a few minutes to perform how to test a circuit breaker Safely checks, you can protect your home and prevent expensive electrical issues before they occur.
Safety Gear Essentials
Testing a circuit breaker involves working with electricity. Safety gear protects you from shocks and injuries. Using the right equipment reduces risks significantly. Prepare yourself with essential safety gear before starting any test on how to test a circuit breaker Safely.
Insulated Gloves
Insulated gloves stop electricity from passing through your hands. They keep you safe from electric shocks during testing. Choose gloves rated for electrical work and check for any damage before use.
Safety Glasses
Safety glasses protect your eyes from sparks and debris. Circuit breaker tests can cause unexpected flashes or small particles. Always wear glasses that fit well and offer full coverage when you perform how to test a circuit breaker safely.
Protective Clothing
Wear clothes made from non-conductive materials. Avoid synthetic fabrics that can catch fire or melt. Long sleeves and pants provide extra protection against burns and electrical arcs while testing a circuit breaker safely.
Rubber-soled Shoes
Rubber-soled shoes reduce the chance of electric shock. They create insulation between you and the ground. Make sure your footwear is dry and in good condition before testing.
Voltage Tester
A voltage tester helps confirm if the circuit is live or dead. Use it before touching any wires or the breaker itself. Always choose a tester that suits your circuit's voltage range for how to test a circuit breaker safely.
Tools You Need
Testing a circuit breaker safely requires the right tools. Each tool plays a key role in making the process accurate and secure. Using proper tools reduces risks and helps you find problems quickly. You cannot perform how to test a circuit breaker safely without adequate tools and protective gear.
Gathering these tools before you start saves time and keeps you organized. Below are the essential tools needed for how to test a circuit breaker safely.
Multimeter
A multimeter measures voltage, current, and resistance. It helps check if the circuit breaker is working properly. Choose a digital multimeter for easy reading and accuracy when you test a circuit breaker safely.
Insulated Screwdrivers
Insulated screwdrivers protect you from electric shock. Use them to open breaker panels or tighten connections. Always pick screwdrivers with proper insulation ratings.
Test Light
A test light shows if electricity flows through the circuit. It is simple and quick to use. This tool helps verify if the breaker is live or off during how to test a circuit breaker.
Personal Protective Equipment (PPE)
PPE includes gloves, safety glasses, and insulated mats. These protect you from electric shocks and injuries. Always wear PPE before working on electrical systems, especially when practicing how to test a circuit breaker safely.
Circuit Breaker Finder
This tool identifies the exact breaker controlling a circuit. It saves time and prevents mistakes. Use a breaker finder for accurate and safe testing of how to test a circuit breaker safely.
Voltage Detector
A voltage detector senses live wires without contact. It alerts you if voltage is present. This tool adds an extra safety check before testing.
Preparing The Circuit Breaker
Turn off the main power before testing the circuit breaker to avoid electric shock. Use insulated tools and wear safety gloves for extra protection. Check the breaker’s condition visually to spot any damage or wear before how to test a circuit breaker safely.
Preparing a circuit breaker is a crucial step for safe testing. Proper preparation ensures accuracy and minimizes risks. Before starting, gather the required tools. These may include a multimeter, screwdriver, and protective gear. Follow the guidelines below to prepare effectively for how to test a circuit breaker safely.
Turn Off Power Supply
Always disconnect the main power before handling a circuit breaker. Verify the breaker is not live using a voltage tester. This step reduces the chance of electric shock when you test a circuit breaker.
Inspect The Circuit Breaker
Check the breaker for visible damage or wear. Look for cracks, discoloration, or loose connections. Damaged breakers should not be tested until repaired.
Wear Protective Gear
Put on safety gloves and goggles to avoid accidental injuries. Electrical testing involves risks, so ensure proper protection — especially when learning how to test a circuit breaker safely.
Gather Necessary Tools
Keep a multimeter, voltage tester, and screwdriver within reach. Organized tools make the process efficient and safer. This preparation is key to how to test a circuit breaker safely.
Identify The Circuit
Label the circuit breaker to avoid confusion. This step is essential in multi-breaker systems for proper identification, particularly when performing how to test a circuit breaker safely.
Ensure A Dry Environment
Make sure the testing area is dry and free from moisture. Wet conditions increase the risk of electrical hazards. A dry workspace is critical when practicing how to test a circuit breaker safely.
Credit: reversepcb.com
Checking For Power
Testing a circuit breaker safely begins with checking for power. This step ensures the breaker is functioning and helps identify potential issues. Always prioritize safety by using the right tools and following precautions.
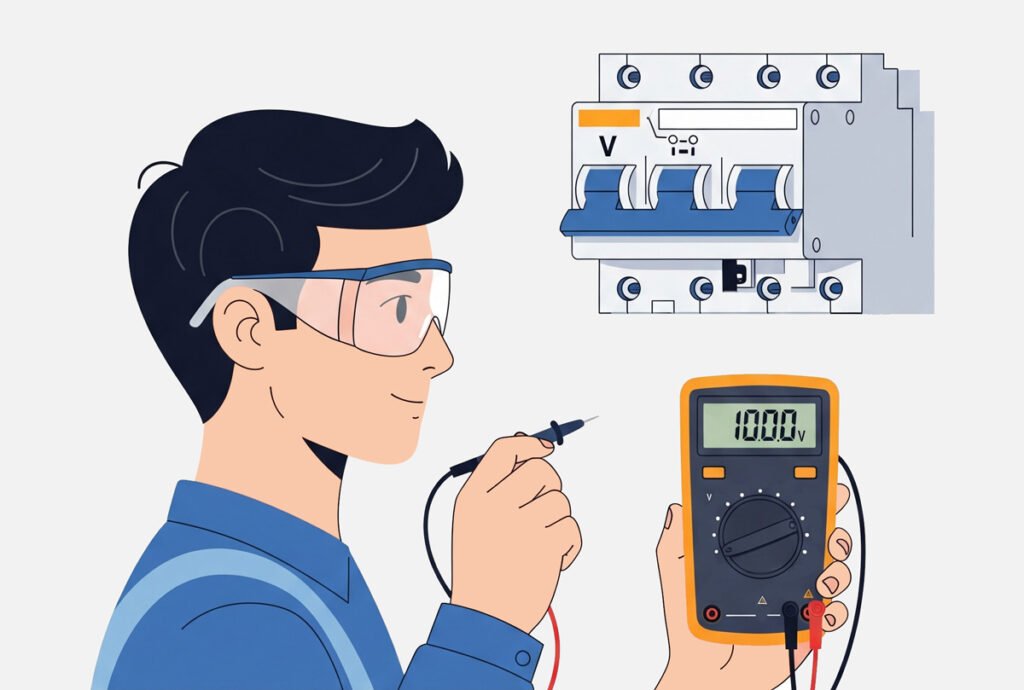
Use A Multimeter To Check Voltage
A multimeter is essential for measuring voltage in your circuit breaker. Set it to AC voltage, as most household circuits use alternating current. Place the probes on the breaker terminals. The reading should match the voltage rating of the breaker, typically 120V or 240V.
Inspect For No Power
If the multimeter shows no reading, the breaker might be tripped. Switch it off and back on to reset it. If there's still no power, the breaker may be faulty or disconnected from the power source.
Test The Breaker Under Load
Turn on connected devices to check if the breaker supplies power. A functioning breaker should handle the load without tripping. If it trips immediately, there may be a wiring or device issue.
Inspecting For Damage
Inspecting a circuit breaker for damage is a crucial step before any testing. Damage can impair the breaker's function and pose serious safety risks. Taking the time to carefully examine the breaker helps you avoid potential hazards and ensures accurate test results.
Visual Inspection Of The Breaker Exterior
Start by looking closely at the breaker’s outer casing. Check for cracks, burns, or discoloration on the plastic housing. These signs often indicate overheating or physical stress that could compromise safety during how to test a circuit breaker safely.
Pay attention to any melted or deformed parts near the breaker’s switch. If you spot corrosion or rust on metal components, it might mean moisture has penetrated the unit, which can cause malfunction.
Checking For Loose or Damaged Connections
Inspect the wiring attached to the breaker carefully. Loose wires can cause sparking or intermittent power loss, which is dangerous. Use a screwdriver to gently test if terminals are tight but avoid overtightening.
Look for frayed insulation or exposed wires around the breaker. Damaged wiring can lead to short circuits, so replace or repair any suspect cables before proceeding with how to test a circuit breaker safely.
Testing The Breaker’s Mechanical Operation
Manually flip the breaker switch on and off to feel its resistance and movement. A smooth, firm action usually means the internal mechanism is intact. If the switch feels sticky or loose, the breaker might be faulty.
Have you ever noticed a breaker that trips too easily or won’t reset? This mechanical failure often starts with subtle physical damage you can detect during inspection.
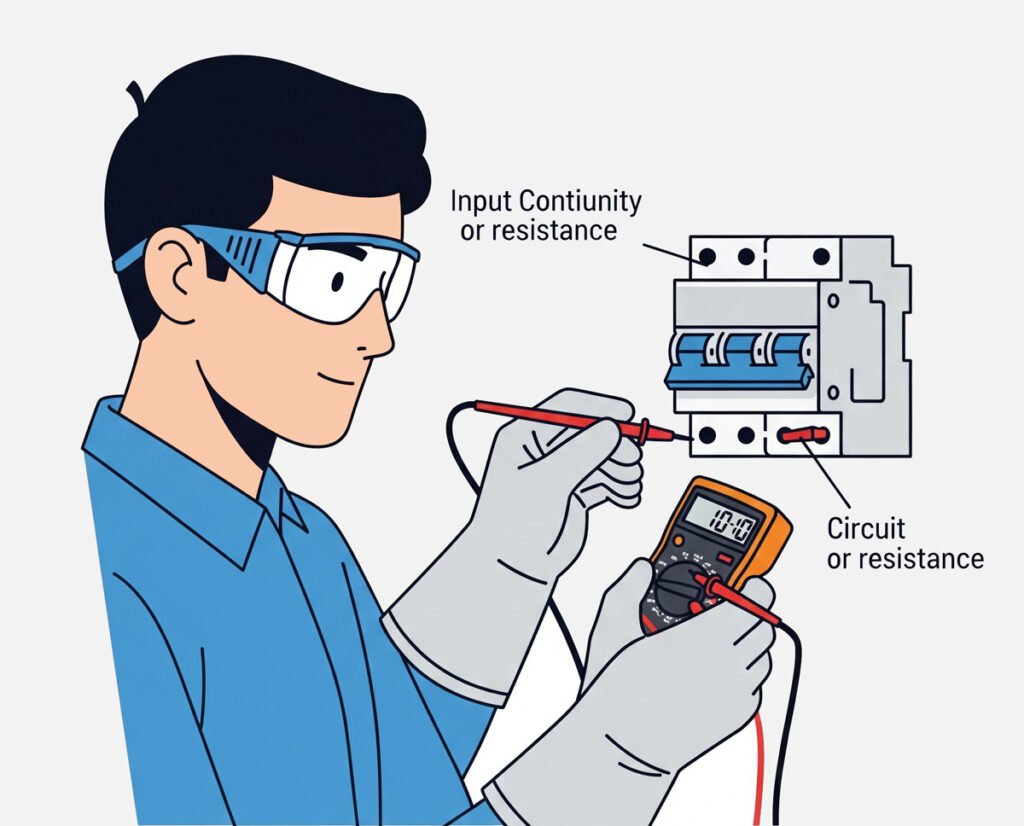
Using A Multimeter
Using a multimeter is a reliable way to test a circuit breaker safely. It helps check whether the breaker allows electricity to flow or if it is faulty. This tool measures electrical values like voltage, current, and continuity. Testing with a multimeter requires careful setup and understanding of the readings to avoid any risks.
Setting Up the Multimeter
First, turn off the power to the circuit breaker you want to test. Safety is important to prevent electric shocks. Set your multimeter to the continuity or resistance mode. This mode often shows a sound or a low number if the circuit is complete.
Use the black probe on the common (COM) port and the red probe on the voltage or resistance port. Check the probes for damage before use. Touch the metal tips together to see if the multimeter beeps or shows zero resistance. This confirms the tool is working.
Testing For Continuity
Remove the circuit breaker from its panel carefully. Place one probe on the breaker’s input terminal. Place the other probe on the output terminal.
If the multimeter beeps or shows a low resistance number, the breaker is good. No beep or a high number means the breaker is broken and needs replacing. Test more than once to be sure.
Always handle the breaker with dry hands and avoid touching metal parts. Testing for continuity helps find faults without power running through the breaker.
Performing A Load Test
Performing a load test on a circuit breaker is a crucial step to ensure it functions correctly under real operating conditions. This test helps verify that the breaker can handle the electrical load without tripping unnecessarily or failing to trip when it should. Let’s dive into how to test a circuit breaker Safely under load and monitor the circuit’s response effectively.
Simulating Electrical Load
To simulate an electrical load, you need to connect a device or appliance that draws a current close to the breaker's rated capacity. Common tools include a resistive load bank or high-wattage appliances like heaters or incandescent lamps. Make sure the load you choose matches the specifications of the circuit breaker to avoid damage.
Before you begin, double-check all connections are secure and insulated. Safety gear such as insulated gloves and safety glasses is essential to protect yourself during the test. Have you ever underestimated how quickly electrical faults can happen? This step reminds you to respect the power you’re working with.
Monitoring Circuit Response
Once the load is applied, carefully observe the circuit breaker's behavior. The breaker should allow the current to flow normally without tripping if the load is within limits. However, if the load exceeds the breaker's rating, it should trip promptly to protect the circuit.
Use a multimeter or clamp meter to measure the current flowing through the circuit. Note any unusual heating, sounds, or smells from the breaker, which may indicate a problem during how to test a circuit breaker safely.
By performing this test, you gain confidence in your circuit breaker’s reliability and enhance the safety of your electrical system.
Credit: reversepcb.com
Identifying Common Issues
Identifying common issues with a circuit breaker is your first step toward ensuring electrical safety. Faulty breakers can cause power outages or even electrical fires if left unchecked. Knowing what signs to look for helps you take quick action and avoid costly repairs or dangerous situations.
Signs Of A Tripped Or Faulty Circuit Breaker
You might notice your lights flickering or appliances suddenly losing power. These symptoms often mean your circuit breaker is tripping frequently. If the breaker won’t reset or keeps tripping, it could be a sign of an overload or a short circuit.
Physical Damage And Wear
Inspect your breaker panel for any visible signs of damage like burn marks, melted parts, or a burning smell. These are serious red flags that something is wrong. Even if the breaker looks fine, old breakers can wear out over time and fail to protect your home properly.
Loose Connections And Corrosion
Loose wiring inside the breaker panel can cause intermittent power issues. Corrosion on terminals or breaker contacts disrupts electrical flow and may cause overheating. Tightening connections and cleaning corrosion can sometimes fix the problem without replacing the breaker.
Overloaded Circuits
Think about how many devices you plug into a single circuit. Overloading can cause breakers to trip repeatedly. You can prevent this by spreading appliances across different circuits or upgrading your electrical panel.
Unusual Noises Or Heat
Have you ever heard buzzing or crackling noises from your breaker box? This can indicate electrical arcing or loose components. Also, if the breaker feels unusually warm to the touch, it’s time to have a professional check it out.
Replacing Faulty Breakers
Testing a circuit breaker safely requires turning off the main power first. Use a voltage tester to check for electricity before handling the breaker. Always wear protective gear to avoid shocks during the process.
Replacing a faulty circuit breaker is an essential skill for anyone dealing with home electrical systems. Whether you’re tackling a breaker that trips constantly or one that refuses to reset, knowing how to safely replace it can save you money and prevent bigger electrical issues. Before diving in, always prioritize safety. With the right tools and precautions, you can replace a breaker with confidence.
How To Identify A Faulty Breaker
Not all electrical issues are caused by the breaker itself. Before replacing it, verify the problem by testing the breaker with a multimeter. A breaker showing zero voltage or inconsistent readings likely needs to be replaced. Be sure to check for visible signs of damage, like burnt areas or cracks on the breaker.
Essential Tools You’ll Need
- Screwdriver set
- Multimeter
- Insulated gloves
- Replacement breaker (matching the specifications of the old one)
Having the right tools ensures a smoother and safer process. Double-check the replacement breaker’s ratings to match your system's requirements.
Steps To Replace A Faulty Breaker Safely
- Turn off the main power supply to your panel to avoid electrical shocks. Test the panel with your multimeter to confirm there’s no active voltage.
- Locate the faulty breaker in the panel and remove its cover using a screwdriver. Breakers are typically clipped in place, so gently pull it out without forcing it.
- Disconnect the wires attached to the faulty breaker. Take note of their arrangement to ensure proper reconnection later.
- Install the new breaker by clipping it into the panel and reconnecting the wires securely. Double-check that all connections are tight.
- Replace the panel cover, turn on the main power supply, and test the new breaker to ensure it’s functioning correctly.
Common Mistakes To Avoid
- Skipping the main power shut-off—this can lead to serious injuries.
- Using a replacement breaker with incorrect specifications—it may not perform properly.
- Failing to check wire connections after installation—loose wires can cause short circuits.
Stay vigilant and don’t rush the process. Attention to detail can prevent costly errors.
Final Check Before Wrapping Up
After the installation, test all the breakers in your panel to ensure everything is functioning as expected. Watch for any unusual behavior, like flickering lights or excessive heat around the panel. If you notice anything off, consult a licensed electrician immediately.
Replacing a breaker might seem intimidating at first, but with practice and caution, you’ll master it quickly. Would you attempt this on your own, or do you prefer calling in a professional? Share your thoughts!

Credit: www.origin-ic.com
Maintenance Tips
Regular maintenance is key to keeping your circuit breakers functioning safely and reliably. Neglecting this can lead to unexpected trips or even electrical hazards. By staying on top of simple upkeep tasks, you protect your home and ensure your electrical system runs smoothly.
Visual Inspection For Signs Of Wear
Start by looking for obvious signs of damage like cracks, corrosion, or discoloration on the breaker and panel. These can indicate overheating or moisture issues. Have you ever noticed a smell like burning near your breaker box? That’s a red flag you shouldn’t ignore.
Regular Testing With The Trip Button
Most breakers have a test button to simulate a fault and check the trip mechanism. Press this button periodically to ensure the breaker disconnects power correctly. If it doesn’t trip, it might be time for a replacement or professional check.
Keep The Panel Clean And Dry
Dust and moisture can cause breakers to malfunction or corrode. Use a dry cloth or vacuum cleaner with a brush attachment to clean inside the panel carefully. Avoid spraying water or cleaning sprays inside the box to prevent electrical shorts.
Check For Loose Connections
Loose wiring can cause arcing or overheating, which is dangerous. Gently tighten screws on terminals if you’re comfortable doing so, but don’t overtighten and always turn off power first. When was the last time you checked your breaker connections? It’s worth the few minutes.
Schedule Professional Inspections
Some issues aren’t visible or easy to fix without specialized tools. Have an electrician inspect your breakers every few years, especially if your home is older or you experience frequent trips. A professional can spot potential problems before they become hazards.
Frequently Asked Questions
How Do I Test A Circuit Breaker Safely?
To test safely, always turn off the main power first. Use a voltage tester to confirm no current flows. Wear insulated gloves and eye protection. Test the breaker with a multimeter or circuit breaker tester as per instructions. Never touch live wires directly.
What Tools Are Needed To Test Circuit Breakers?
You need a multimeter or circuit breaker tester, insulated gloves, and a voltage tester. A screwdriver and flashlight might help. These tools ensure accurate testing and protect you from electric shocks. Always use properly rated and well-maintained equipment for safety.
How Often Should Circuit Breakers Be Tested?
Test circuit breakers at least once a year. Regular testing ensures they function properly during electrical faults. If you experience frequent power issues, test more often. Regular checks prevent electrical hazards and costly repairs by detecting faulty breakers early.
Can I Test a Circuit Breaker Without Removing It?
Yes, you can test some breakers without removal using a clamp meter or breaker tester. However, for detailed testing, removal might be necessary. Always ensure power is off before handling breakers, and follow manufacturer instructions to avoid risks and damage.
Conclusion
Testing a circuit breaker safely protects you and your home. Always turn off the main power before starting. Use the right tools to avoid accidents. Check the breaker regularly to keep your electrical system healthy. Stay calm, follow steps carefully, and never rush the process.
Safety matters more than speed. Keep learning about basic electrical safety to stay prepared. Testing a breaker might seem hard, but careful work makes it simple. Your safety depends on how you handle the task. Take your time and stay safe.