How to Sew on a Snap Fastener: Step‑by‑Step Guide for Beginners
Have you ever struggled with a loose button or a broken zipper just when you needed your clothes to work perfectly? Snap fasteners are a simple, strong solution that can save your favorite garments from wardrobe disasters.
But if you’ve never sewn one on before, it might feel a bit tricky. Don’t worry—this guide will show you exactly how to sew on a snap fastener quickly and easily. By the end, you’ll have the skills to fix or upgrade your clothes with confidence.
Ready to learn a handy sewing trick that makes your life easier? Let’s get started!
Types Of Snap Fasteners
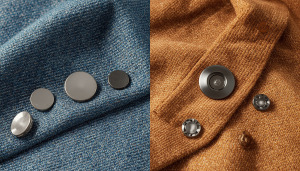
Snap fasteners come in various types, each suited for different projects and materials. Knowing the differences helps you pick the right one for your sewing task. Whether you want durability, ease of use, or a specific look, understanding these types can save you time and frustration.
Metal Snap Fasteners
Metal snap fasteners are the most common and sturdy option. They hold up well on heavy fabrics like denim or canvas and offer a clean, classic finish. If you want your snaps to last through many washes and daily wear, metal is often the best choice.
One tip: metal snaps need a special tool for installation, so make sure you have the right pliers or press before starting your project. Have you noticed how tough your old jackets feel? That’s probably because of metal snaps.
Plastic Snap Fasteners
Plastic snaps are lighter and often come in colorful varieties. They are ideal for baby clothes or lightweight materials where metal might be too harsh. Plus, plastic snaps are usually easier to sew on by hand or machine since they don’t require heavy-duty tools.
If you want your project to be soft and flexible, plastic snaps can be a great solution. Do you prefer bright colors or subtle tones? Plastic snaps give you more options to match your fabric perfectly.
Magnetic Snap Fasteners
Magnetic snaps offer a modern twist by using magnets to close instead of a mechanical lock. They are popular in bags and accessories because they’re quick to open and close. If you want convenience without compromising style, magnetic snaps might be worth trying.
Keep in mind that magnetic snaps are not as strong as metal or plastic ones for heavy-duty use. They work best on projects where ease of access is key. Have you ever struggled with tiny snaps? Magnets solve that problem effortlessly.
Tools And Materials Needed
Sewing on a snap fastener requires specific tools and materials. These help make the process smooth and the results strong. Having the right items ready saves time and avoids frustration. Below are the essential tools and materials you need to start.
Needles And Thread
- Choose sharp sewing needles suitable for your fabric.
- Use strong thread to hold the snap firmly in place.
- Polyester thread works well for most fabrics.
- Match thread color to your fabric for a clean look.
- A thimble can protect your finger when pushing the needle.
Snap Fastener Kit
- Buy a snap fastener kit that includes both parts of the snap.
- Some kits come with a tool to press snaps securely.
- Make sure the snap size fits your project needs.
- Plastic and metal snaps are common; choose based on fabric type.
Fabric And Marking Tools
- Select fabric suitable for the snap size and use.
- Use fabric chalk or washable markers to mark snap positions.
- A ruler or measuring tape helps place snaps evenly.
- Prepare fabric edges to avoid fraying before sewing snaps.
Preparing The Fabric
Preparing the fabric is the first key step before sewing on a snap fastener. This stage sets the foundation for a neat and durable attachment. Taking time here prevents fabric damage and keeps the snap secure over time.
Proper preparation helps the snap sit correctly and function smoothly. It also makes sewing easier and faster. Careful fabric handling reduces puckering and distortion around the snap area.
Marking Snap Placement
Start by marking the exact spot for the snap. Use a fabric pencil or tailor’s chalk. Make small, clear marks that won’t show through the fabric later.
Measure both parts of the snap to ensure they align perfectly. Mark both sides of the fabric if sewing on a closure. Double-check the marks before sewing to avoid mistakes.
Reinforcing Fabric
Thin or delicate fabrics need extra strength around the snap area. Use a small piece of interfacing or fabric patch behind the snap spot. This reinforcement keeps the fabric from tearing.
Cut the patch slightly larger than the snap base. Iron the interfacing or sew the patch in place before attaching the snap. This step creates a solid base for the fastener.
Attaching The Snap Fastener
Attaching a snap fastener to fabric is simple and quick. It gives your project a neat, professional finish. Each snap has two parts: the socket and the stud. Sew each part carefully for a strong hold. Use a needle and thread that match your fabric color.
Sewing The Socket Side
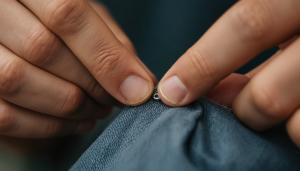
Place the socket on the fabric where you want the snap. Hold it firmly so it does not move. Thread your needle and knot the end. Sew around the holes of the socket.
- Push the needle through the fabric and socket hole.
- Bring the needle back down close to the hole.
- Repeat several stitches to secure it well.
- Make sure stitches are tight but not too tight.
- Finish by tying a knot on the inside of the fabric.
Sewing The Stud Side
Place the stud on the matching spot opposite the socket. This allows the snap to close properly. Use the same sewing method as the socket side.
- Align the stud with the fabric.
- Sew through each hole in the stud base.
- Make several tight stitches to hold it firmly.
- Secure with a knot on the fabric’s inside.
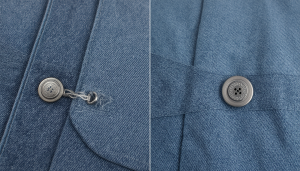
Check the snap by pressing the two sides together. It should close securely and open with gentle pull.
Tips For Durable Attachment
Attaching a snap fastener that lasts requires more than just stitching it on. Paying attention to the details ensures your snaps stay put through wear and washing. Here are some practical tips to help you achieve a strong, durable attachment every time.
Choosing The Right Thread
Your thread choice can make or break the snap’s hold. Opt for a polyester or nylon thread because they are stronger and have a bit of stretch, which helps absorb stress on the snap. Avoid cotton threads as they tend to weaken and break faster with tension.
Match the thread thickness to the fabric weight and snap size. Thicker fabric and larger snaps need heavier thread to hold tight. Have you noticed how some threads fray quickly? That’s a sign you need to upgrade your thread quality.
Securing Stitches
Make your stitches count by sewing through the snap holes multiple times. This creates a reinforced hold that resists pulling and twisting. Use small, tight stitches to keep the snap firmly attached without leaving gaps.
Try knotting your thread securely on the backside and weave the thread through previous stitches before cutting it. This prevents the snap from loosening over time. Have you ever had a snap pop off unexpectedly? This technique helps avoid that frustration.
Testing The Snap
Before finishing, give your snap a few strong pulls and clicks. This tests whether your stitching can handle real-life use. If the snap feels loose or wobbly, reinforce it with more stitches before moving on.
Don’t forget to check the snap’s alignment with its counterpart. Misaligned snaps wear out faster and can damage your fabric. How often do you test fasteners after sewing? It’s a simple step that saves you from redoing work later.
Common Mistakes To Avoid
Sewing on snap fasteners might seem straightforward, but certain mistakes can turn your project from neat to messy quickly. Avoiding these common errors will save you time and frustration, and ensure your snaps function perfectly. Let’s look at some pitfalls that often trip up beginners and how to steer clear of them.
Misaligned Snaps
Nothing feels worse than finishing your sewing only to find the snaps don’t line up. Misalignment causes snaps to not close properly, which defeats their purpose entirely. To avoid this, always mark the exact spot on both fabric pieces before you start sewing.
Use pins or tailor’s chalk to check alignment before stitching. Take your time to double-check placement by closing the snaps temporarily. This small pause can save you from having to redo your work.
Loose Stitches
Loose stitches make your snap fastener weak and prone to falling off. If you notice your stitches are too loose, the snap won’t hold under pressure and may come off easily. To fix this, keep your stitches tight and consistent around the snap base.
Try pulling the thread gently to test firmness as you sew. If your thread feels slack, tighten it before continuing. Remember, durability depends on how securely the snap is attached.
Using Wrong Snap Size
Choosing the wrong snap size can affect both the look and function of your garment or project. Oversized snaps may look bulky and catch on things, while too-small snaps might not hold fabric securely. Think about the fabric thickness and the garment’s use when selecting snap size.
For example, heavy denim needs larger, stronger snaps, while light cotton dresses work well with smaller ones. If you’re unsure, test different sizes on scrap fabric to see what fits best. This step helps you avoid replacing snaps later.
Alternatives To Sewing Snaps
Not everyone enjoys sewing, and sometimes you just need a quicker or more convenient solution for attaching snap fasteners. Thankfully, there are several alternatives that don’t require needle and thread. Whether you're short on time or simply looking for an easier approach, these methods can save the day.
Using Snap Pliers
Snap pliers are a fantastic tool for installing snaps without sewing. They work by pressing the snap pieces securely onto the fabric using manual force. This method is ideal for thicker materials like canvas or denim, where sewing might feel like a chore.
To use snap pliers, align the snap components with the fabric and position them in the pliers. Squeeze the handles firmly to lock the snap into place. It’s that simple!
Snap pliers are affordable and widely available at craft stores. If you’re working on multiple projects, investing in one can save you plenty of time and frustration.
No-sew Snap Options
If tools like pliers aren’t your thing, consider no-sew snap options like adhesive-backed snaps. These snaps stick directly onto the fabric, making them perfect for lightweight materials or temporary fixes. Keep in mind, they might not hold up as well for heavy-duty use.
Another great no-sew alternative is iron-on snaps. These snaps bond to fabric using heat, providing a strong and durable attachment. All you need is an iron and a few minutes to apply them.
Think about how often the snap will be used and the type of fabric you’re working with. For high-use items, opt for iron-on snaps over adhesive ones for better durability.
Frequently Asked Questions
How Do You Attach A Snap Fastener Correctly?
To attach a snap fastener, mark its position on the fabric. Sew the snap halves securely with even, small stitches. Ensure proper alignment of both sides to avoid misplacement when fastening.
What Tools Are Needed To Sew A Snap Fastener?
You’ll need a needle, matching thread, scissors, and the snap fastener. Optional tools include fabric chalk for marking and a thimble.
How Do You Prevent A Snap Fastener From Coming Loose?
Use strong thread and tight stitches when sewing the snap fastener. Reinforce the fabric layer if it’s too thin or weak.
Can I Sew A Snap Fastener On Stretchy Fabric?
Yes, but reinforce the fabric with interfacing first. This prevents the snap from pulling or damaging the stretchy material over time.
Conclusion
Sewing on a snap fastener is a simple skill anyone can learn. With practice, your stitches will look neat and strong. Choose the right tools and fabric for best results. Take your time to align the snap carefully. This small detail can improve many clothing projects.
Keep trying, and soon you will sew snaps with ease. Enjoy adding this useful skill to your sewing toolkit.