2 Lights 2 Switches 1 Power Source Wiring Diagram: Wiring two lights with two switches from a single power source might sound complex, but it’s actually straightforward with the right diagram and guidance. Whether you're a DIY enthusiast or just trying to improve your home's lighting control, this setup lets you operate two lights independently without unnecessary wiring.
In this guide, you’ll find a clear and simple wiring diagram to help you complete the job safely and efficiently. By the end, you’ll have full control over your lighting system—with minimal hassle.
Basic Wiring Components
Wiring two lights with two switches from one power source needs certain parts. Knowing these parts helps you set up the system safely.
This guide explains the main components in simple terms. It helps you understand how the wiring works.
Power Source Essentials
The power source gives electricity to the lights and switches. It is usually a circuit breaker panel in your home.
The power source has three main wires: live (hot), neutral, and ground. Each has a special job in the wiring system.
- Live wire:carries electricity to the switches and lights
- Neutral wire:completes the electric circuit back to the source
- Ground wire:protects from electrical shocks and faults
Types Of Switches
Switches control the power to each light. Different types of switches fit different wiring setups.
For two lights and two switches, single-pole switches are common. Each switch turns one light on or off.
- Single-pole switch:controls one light from one location
- Three-way switch:controls one light from two locations (not used here)
- Dimmer switch:adjusts light brightness
Light Fixtures Overview
Light fixtures hold the bulbs and connect to the wiring. They come in many styles and sizes.
Each fixture needs a live, neutral, and ground wire connection. This keeps the light safe and functional.
- Ceiling lights:mounted on the ceiling, common in rooms
- Wall lights:mounted on walls for extra lighting
- Outdoor lights:made for weather resistance
Credit: www.diychatroom.com
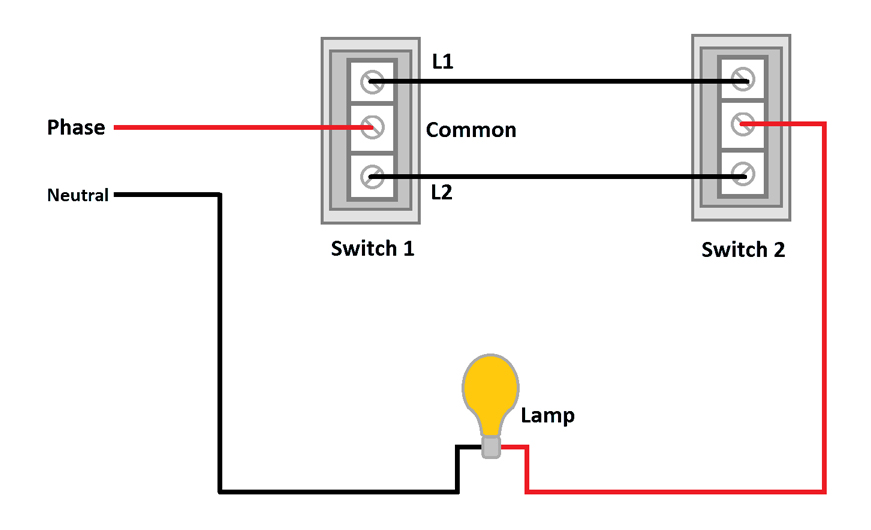
Wiring Diagram Layout
This wiring diagram shows how to connect two lights with two switches using one power source. It helps you understand the wiring paths clearly.
Each part of the wiring has a specific role. Following the layout makes installation safe and effective.
Connection Between Power Source And Switches
The power source usually enters the circuit at the switch box. The live (hot) wire connects first to the switches to control the lights.
- The black wire carries power from the source to each switch.
- Switches act as a break in the circuit to turn lights on or off.
- The white neutral wire bypasses switches and goes directly to the lights.
Switches To Lights Wiring
From each switch, a wire runs to its corresponding light. This wire controls the light's power flow.
| Switch | Wire Color | Connected To |
| Switch 1 | Black (Switched Hot) | Light 1 |
| Switch 2 | Black (Switched Hot) | Light 2 |
Neutral And Ground Wire Paths
Neutral and ground wires complete the electrical circuit and ensure safety. They follow specific paths in the wiring layout.
Neutral Wire Path:The white neutral wire runs from the power source directly to both lights. It does not connect to the switches.
Ground Wire Path:The green or bare copper ground wire connects all metal boxes, switches, and light fixtures. This wire provides protection in case of faults.
Step-by-step Wiring Process
This guide explains how to wire two lights with two switches from one power source. Follow each step carefully for a safe and effective setup.
Make sure to have the right tools ready, such as a voltage tester, wire strippers, and screwdrivers. Safety is the top priority.
Turn Off Power Safely
Before starting, switch off the main breaker to cut power to the circuit. Use a voltage tester to confirm no electricity is flowing.
Connect Power To Switches
Run the power source cable to the first switch box. Connect the live (hot) wire to the common terminal of the first switch.
- Strip the wires to expose about half an inch of copper.
- Attach the live wire to the common terminal on the first switch.
- Connect traveler wires between the two switches’ traveler terminals.
- Connect the neutral wire directly to the light fixture wires.
Wire Switches To Lights
From the second switch, run wires to both light fixtures. Connect the switched live wires to the lights’ live terminals.
| Wire | From | To |
|---|---|---|
| Live | Power Source | First Switch Common Terminal |
| Traveler Wires | First Switch | Second Switch Traveler Terminals |
| Switched Live | Second Switch | Light Fixtures |
| Neutral | Power Source | Light Fixtures |
| Ground | Power Source | Switch Boxes and Lights |
Secure Neutral And Ground Connections
Join all neutral wires together with a wire connector inside the switch box or junction box. Do the same for all ground wires.
- Use wire nuts to twist neutral wires tightly.
- Connect ground wires to the green screws on switches and lights.
- Make sure no bare wires are exposed outside connectors.
Test The Setup
Turn the main breaker back on. Test each switch to confirm both lights turn on and off correctly from either switch.
- Flip one switch and observe the lights.
- Flip the other switch to check the control works from both ends.
- If lights do not work properly, turn power off and recheck connections.

Credit: www.youtube.com
Common Wiring Configurations
Wiring two lights with two switches from one power source is common in homes. It allows control of each light from a separate switch.
This setup needs careful wiring to ensure safety and proper function. Below are common ways to wire these switches and lights.
Single-pole Switch Setup
In a single-pole setup, each switch controls one light. Power comes from the source to each switch, then to each light.
Use a wire to bring power to each switch box. Then, run a wire from each switch to its light. This is simple and easy to install.
- Power source connects to both switches separately
- Each switch has a hot wire and a wire to its light
- Neutral wires connect directly to the lights
Three-way Switch Option
A three-way switch allows control of one light from two places. For two lights, use two sets of three-way switches.
This setup uses traveler wires between switches and a common wire to the light. It is more complex but offers flexible control.
- Each light has two three-way switches
- Traveler wires connect the switches
- Power can come to the switch or light box
Using Multi-wire Cables
Multi-wire cables carry multiple circuits in one cable. This saves space and reduces wiring mess in the walls.
Use a cable with three or more conductors plus a ground. It allows wiring both switches and lights from one cable run.
- One conductor powers switch one and its light
- Another conductor powers switch two and its light
- Neutral and ground wires serve both circuits
Troubleshooting Tips
Wiring diagrams can be confusing. Understanding them helps fix electrical issues. This guide provides troubleshooting tips.
You will learn to identify errors, fix flickering lights, and deal with switch problems.
Identifying Wiring Errors
Wiring errors can cause serious issues. Identifying them is crucial for safety.
- Check for loose connections at switches and lights.
- Ensure wires are not frayed or damaged.
- Verify that all wire colors match the diagram.
Fixing Flickering Lights
Flickering lights can be annoying. They may signal a deeper problem.
| Problem | Solution |
| Loose bulb | Tighten the bulb in its socket. |
| Faulty switch | Replace the defective switch. |
| Inconsistent power | Check the power source stability. |
Dealing With Switch Malfunctions
Switch malfunctions can disrupt lighting. Address them promptly to prevent further issues.
Safety Precautions
Wiring two lights with two switches from one power source needs care. Safety is the top priority to avoid accidents.
Follow safety rules to protect yourself and your home while working on electrical wiring.
Proper Tools And Equipment
Use the right tools to make wiring easier and safer. The correct equipment helps prevent mistakes.
- Insulated screwdrivers
- Voltage tester
- Wire strippers
- Electrical tape
- Wire nuts
- Safety gloves
Avoiding Electrical Hazards
Turn off power at the breaker box before starting any wiring. Check that power is off with a tester.
Never touch wires with wet hands or stand on wet floors. Keep your work area dry and clean.
- Always switch off the main power
- Use a voltage tester to confirm no power
- Wear insulated gloves
- Keep area dry and well-lit
- Do not overload circuits
When To Call A Professional
Call an electrician if you feel unsure about wiring. Complex wiring or old homes need expert help.
It is safer to get professional help than to risk injury or damage to your home.
- If you see damaged wires or outlets
- If you do not know how to use tools
- If wiring is confusing or complicated
- If circuit breakers trip often
- When local codes require a permit

Credit: www.reddit.com
Frequently Asked Questions
How Do You Wire 2 Lights With 2 Switches?
To wire 2 lights with 2 switches, use a 3-wire cable connecting both switches and lights. Connect the power source to the first switch, then run wires to the second switch and lights. This setup allows independent control of each light from separate switches.
What Is The Role Of The Power Source In This Wiring?
The power source provides electricity to both switches and lights. It usually connects to the first switch’s common terminal. From there, power flows through the switches to the lights. Proper power source wiring ensures safe and efficient operation of the lighting circuit.
Can I Control 2 Lights With 2 Separate Switches?
Yes, you can control 2 lights independently using 2 switches. Each switch connects to one light through separate traveler wires. This wiring allows turning each light on or off without affecting the other. It’s ideal for rooms needing flexible lighting control.
What Wiring Diagram Is Best For 2 Switches And 1 Power Source?
A diagram showing a power source entering the first switch box, then connecting to the second switch and both lights is best. This layout uses traveler wires between switches and separate wires to each light. It simplifies installation and troubleshooting.
Conclusion
Wiring two lights with two switches and one power source is simple. Follow the diagram step by step to avoid mistakes. Each switch controls a light independently. Use proper tools and safety gear while working. Double-check connections before turning on the power.
This setup saves space and adds convenience to your home. Understanding basic wiring helps with future projects too. Try it yourself with caution and patience. You can achieve a neat and functional wiring system easily.