

Are you puzzled by the intricacies of electrical wiring in your home? Do you find yourself overwhelmed when faced with a three-way electrical wiring diagram?
You're not alone. Many homeowners and DIY enthusiasts encounter this common challenge, and the good news is, you're in the right place to demystify it. Imagine the convenience of confidently navigating your home’s lighting systems with ease. You’ll discover the simplicity behind three-way electrical wiring diagrams, and by the end, you'll feel empowered to tackle your own electrical projects with confidence.
Ready to illuminate your understanding? Let’s dive in!
Credit: www.doityourself.com
Basics Of Three Way Wiring
Understanding the basics of three way wiring is essential for many home electrical projects. It allows control of a single light or device from two different locations. This setup is common in hallways, staircases, and large rooms.
Three way wiring offers convenience and flexibility. Learning its fundamentals helps avoid mistakes and ensures safety.
What Is Three Way Wiring
Three way wiring is a type of electrical circuit. It uses two switches to control one light or group of lights. Each switch can turn the light on or off independently. This wiring is different from a regular single switch setup.
It uses special switches called three way switches. These have three terminals instead of two. The switches connect with a traveler wire that carries current between them.
Key Components Needed
- Two three way switches
- Light fixture or load
- Traveler wires (usually two)
- Neutral wire
- Ground wire
- Power source (breaker panel)
Each component has a role in completing the circuit safely. The traveler wires link the switches. The ground wire protects from electrical faults.
Tools Required
- Voltage tester
- Wire stripper
- Screwdriver set
- Needle-nose pliers
- Electrical tape
- Wire nuts or connectors
Using the right tools makes wiring easier and safer. Always turn off power before starting any work.
How Three Way Switches Work
Understanding how three way switches work helps to control a single light from two different places. This setup is useful in large rooms, hallways, or staircases. It provides flexibility by allowing you to turn lights on or off from two locations.
Switch Functionality
Each three way switch has three terminals. One is the common terminal, and the other two are traveler terminals. The common terminal connects to either the power source or the light fixture. The traveler terminals connect the two switches together.
Flipping one switch changes the path of electricity. This action either powers the light or cuts off power. Both switches work together to control the light’s state.
Wiring Paths Explained
The wiring includes a hot wire, two traveler wires, and a neutral wire. The hot wire brings electricity to the first switch’s common terminal. The traveler wires connect the traveler terminals of both switches. The light connects to the common terminal of the second switch.
Electricity flows through one traveler wire or the other, depending on switch positions. This flow determines if the light is on or off. The neutral wire completes the circuit back to the power source.
Preparing For Installation
Preparing for a three-way electrical wiring installation is key to a smooth project. Careful preparation saves time and avoids mistakes. Understanding the process before starting helps you work safely and efficiently.
Safety Precautions
Turn off power at the circuit breaker before starting any work. Use a voltage tester to confirm wires are not live. Wear insulated gloves and safety glasses to protect yourself. Avoid working in wet or damp areas. Keep your workspace clean and organized to prevent accidents.
Gathering Materials
Collect all necessary tools and supplies before you begin. You will need:
- Three-way switches
- Electrical wires (14 or 12 gauge depending on circuit)
- Wire nuts
- Electrical tape
- Voltage tester
- Screwdrivers and wire strippers
- Electrical boxes
Having everything ready helps the installation go faster and smoother.
Planning Your Layout
Decide the locations for the switches and light fixtures. Draw a simple wiring diagram to visualize connections. Identify the power source and where wires will run. Plan the route to minimize wire length and avoid obstacles. Clear marking of wire paths reduces confusion during installation.
Credit: www.doityourself.com
Step-by-step Wiring Process
The step-by-step wiring process simplifies the installation of a three-way switch. This guide breaks down each task into clear, easy actions. Understanding these steps helps ensure a safe and functional circuit. Follow each part carefully for best results.
Turning Off Power
Safety starts by turning off power at the circuit breaker. Confirm the power is off using a voltage tester. Never begin wiring with live electricity. This step protects you from shocks and damage.
Wiring The First Switch
Identify the common terminal on the first switch. Connect the power supply wire to this terminal. Attach traveler wires to the remaining terminals. Use wire nuts to secure connections. Keep wires neat and organized.
Connecting The Second Switch
At the second switch, locate the common terminal. Attach the wire that leads to the light fixture here. Connect traveler wires to the other terminals. Match wire colors to avoid confusion. Tighten all screws firmly.
Hooking Up The Light Fixture
Connect the fixture’s hot wire to the wire from the second switch. Join the neutral wires from the power source and fixture. Attach the ground wires together and to the fixture. Use wire nuts for safe, secure connections.
Testing The Circuit
Restore power at the breaker. Test each switch to ensure the light turns on and off. Check both switches for proper function. If the light does not work, recheck all connections. Confirm safety before finishing the project.
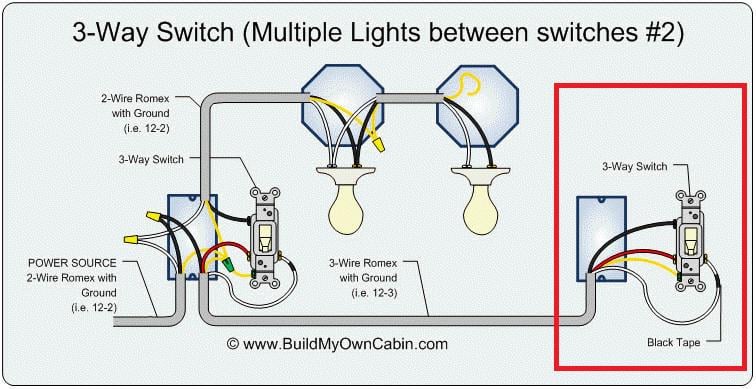
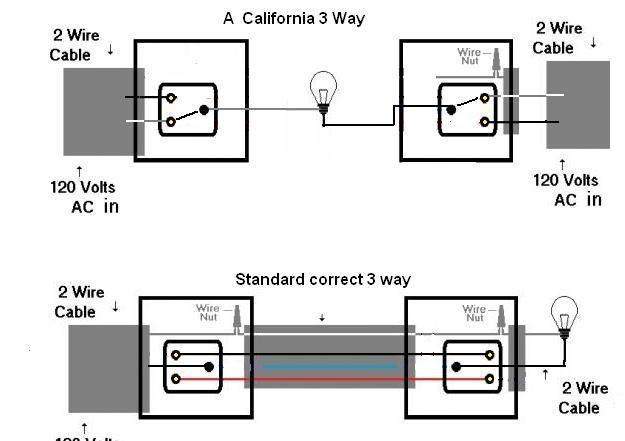
Common Wiring Diagrams
Understanding common wiring diagrams is key to mastering three way electrical wiring. These diagrams show how switches and lights connect, helping you control a single light from two different locations. You might think wiring is complex, but breaking down these common setups makes it manageable.
Basic Three Way Diagram
The basic three way wiring diagram involves two switches controlling one light. Both switches connect with traveler wires that carry current back and forth. This setup is straightforward and ideal for hallways or staircases where you want to turn lights on or off from either end.
Imagine you walk into a dark hallway and can switch the light on near the entrance, then turn it off at the other end before going to bed. This simple wiring achieves that convenience without complicated parts.
With Power At Switch
In this arrangement, the power source comes directly to one of the switches first. From there, the wiring continues to the second switch and then to the light fixture. This method often simplifies wiring because the switches handle the power flow directly.
If you’ve ever opened a switch box and noticed multiple wires, this might be why. It also means you can test the power right at the switch, which can be handy during installation or troubleshooting.
With Power At Light
Here, the power source feeds the light fixture first before reaching the switches. The two switches then control the light by interrupting the current flow on the return path. This layout can save wiring materials but requires careful attention to wire connections.
Have you wondered why some light fixtures have extra wires in their box? This setup explains it. It also means you need to know which wires control power and which carry signals between switches.
Troubleshooting Tips
Troubleshooting a three way electrical wiring diagram can feel tricky, especially when something doesn’t work as expected. Understanding common issues and how to fix them will save you time and frustration. Let’s look at some practical tips to diagnose and resolve typical problems.
Switch Not Working
If one of your switches isn’t working, first check the connections inside the switch box. Loose wires or poor contacts are often the culprit.
Turn off the power and use a voltage tester to ensure no current is flowing before you start. Confirm that the traveler wires are connected correctly according to your wiring diagram.
Sometimes, replacing the switch itself is necessary if it’s faulty. Have you double-checked the ground wire? Missing this can cause the switch to malfunction.
Light Flickering
Flickering lights usually indicate a loose connection or an incompatible bulb. Start by tightening all wire nuts and screw terminals in the switch and light fixture.
Try swapping the bulb with a new one to rule out bulb issues. LED bulbs, in particular, may flicker if they don’t match the dimmer or switch type.
Does your wiring include any old or damaged cables? Aging wiring can cause intermittent contact, leading to flickering.
Short Circuits
Short circuits can be dangerous and must be addressed immediately. Look for signs like tripped breakers or burning smells near switches or outlets.
Inspect the wiring for exposed copper touching other wires or metal parts. Make sure all wire insulation is intact and that no wires are pinched inside boxes.
Have you used a multimeter to test for continuity between wires where there shouldn’t be any? This helps pinpoint the exact location of the short.
Upgrading And Maintenance
Keeping a three-way electrical wiring system updated and maintained improves safety and performance. Regular attention helps avoid faults and extends switch lifespan. Simple upgrades also add convenience and modern features to your home lighting.
Replacing Old Switches
Old switches wear out and may cause flickering lights or connection issues. Replacing them with new ones ensures reliable operation and safety. Choose switches that fit your existing wiring setup to avoid rewiring.
Turn off power before replacing any switch. Use a voltage tester to confirm no electricity flows. Follow the wiring diagram to connect wires correctly. Secure the switch tightly to prevent loose connections.
Adding Smart Controls
Smart switches offer remote control and automation features. They integrate with home assistants and smartphone apps. Installing smart controls in a three-way wiring system can be straightforward.
Check compatibility with your wiring before buying smart switches. Many models support three-way connections. Smart controls provide energy savings and convenience without complex rewiring.
Routine Checks
Regular inspections catch problems early. Look for loose wires, burn marks, or unusual sounds near switches. Test each switch to confirm it controls the light properly.
Use a flashlight to see inside switch boxes. Tighten any loose screws and clean dust buildup. Schedule checks every six months to keep wiring safe and functional.

Credit: www.reddit.com
Frequently Asked Questions
What Is A Three-way Electrical Wiring Diagram?
A three-way wiring diagram shows how to connect two switches to control one light. It helps electricians and DIYers visualize wiring paths and connections for safe and functional installation.
How Does Three-way Switch Wiring Work?
Three-way wiring uses two switches connected by traveler wires. Either switch can turn the light on or off, allowing control from two locations.
What Tools Are Needed For Three-way Wiring Installation?
You need a voltage tester, wire strippers, screwdriver, electrical tape, and wire nuts. These tools ensure safe and correct wiring connections.
Can I Install Three-way Wiring Myself Safely?
Yes, with basic electrical knowledge and safety precautions. Always turn off power and follow wiring diagrams carefully to avoid hazards.
Conclusion
Understanding a three way electrical wiring diagram helps control lights from two places. It makes managing your home lighting easier and safer. Follow the steps carefully to avoid mistakes. Use clear wires and proper tools for best results. This knowledge can save time and money during installation.
Keep your workspace organized and check connections twice. With practice, wiring becomes simpler and more confident. Stay safe and enjoy the convenience of three way switches.

