Are you curious about measuring electrical current safely and quickly? A clamp on multimeter is a powerful tool that lets you do just that without touching wires directly.
Whether you’re a beginner or someone looking to sharpen your skills, knowing how to use this device can save you time and keep you safe. In this guide, you’ll discover simple steps and insider tips that make using a clamp on multimeter easy and effective.
Keep reading, and you’ll feel confident tackling electrical tasks like a pro.

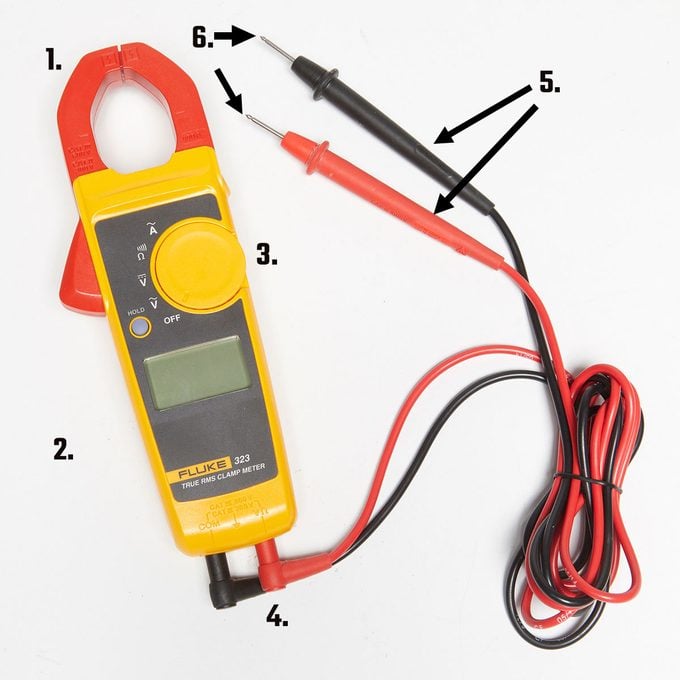
Credit: www.youtube.com
Choosing The Right Clamp Meter
Choosing the right clamp meter is important for accurate and safe measurements. Different types fit different tasks and skill levels.
This guide helps you understand key features and safety ratings. It will make your choice easier and safer.
Types Of Clamp Meters
Clamp meters come in various types. Each type measures different electrical values and suits specific jobs.
- Basic Clamp Meters:Measure AC current only. Good for simple home use.
- Digital Clamp Meters:Show readings on a digital screen. Can measure AC/DC voltage and resistance.
- True RMS Clamp Meters:Provide accurate readings on non-linear loads. Needed for complex electronics.
- Flexible Clamp Meters:Use a flexible coil to measure large or hard-to-reach cables.
Key Features To Consider
Look for features that match your needs. Not all clamp meters have the same functions or quality.
| Feature | Benefit |
| Measurement Range | Checks if the meter can handle your expected current and voltage. |
| Display Type | Digital screens are easier to read than analog dials. |
| Auto-Ranging | Automatically selects the correct measurement range for you. |
| Data Hold | Keeps the reading on screen for review after measurement. |
| Backlight | Helps reading in low light conditions. |
| Jaw Size | Must fit around the cables you plan to measure. |
Safety Ratings And Standards
Safety ratings show if the clamp meter meets industry rules. This protects you from electric shock and damage.
- CAT Ratings:Categories like CAT II, CAT III, and CAT IV show safe usage areas.
- Voltage Rating:The highest voltage the meter can handle safely.
- Insulation Quality:Good insulation lowers risk of electric shock.
- Compliance Marks:Look for CE, UL, or IEC marks for trusted safety standards.
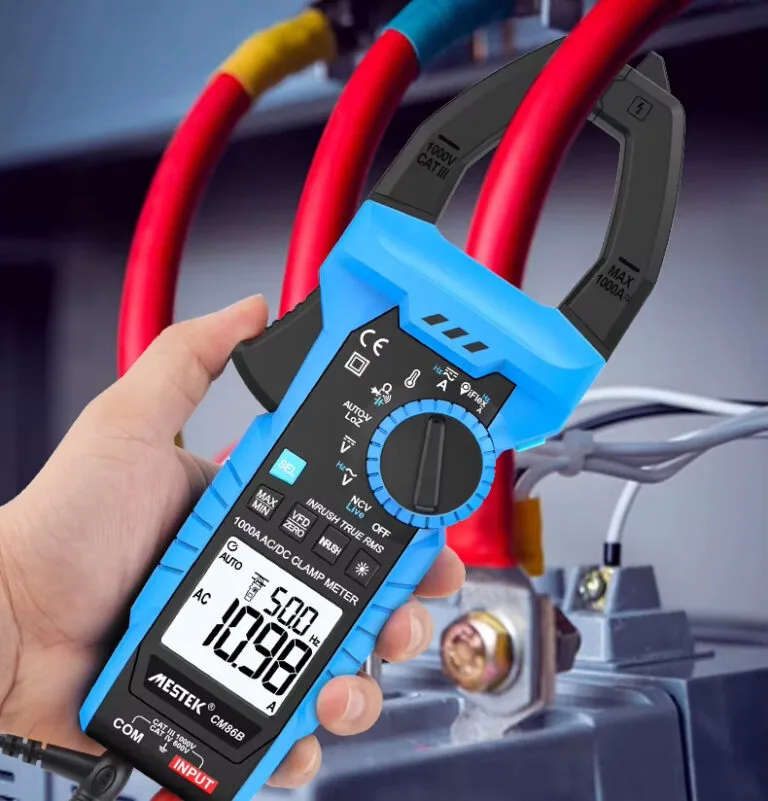
Credit: www.familyhandyman.com
Setting Up Your Clamp Meter
Using a clamp meter correctly helps you measure electrical current safely. This guide shows you how to set up your clamp meter before use.
Follow simple steps to power on, calibrate, select modes, and attach test leads properly.
Powering On And Calibration
Turn on your clamp meter by pressing the power button. Some models have a rotary switch to turn on and select functions.
Calibration ensures accurate readings. Most clamp meters auto-calibrate when powered on. Wait a few seconds for the meter to stabilize.
- Press power button or turn rotary switch
- Wait for the display to show zero or stable reading
- Recalibrate if the meter shows unusual values
Selecting Measurement Modes
Choose the correct mode for the measurement you want. Clamp meters usually measure current, voltage, and resistance.
Use the rotary switch or mode button to select the measurement type. Check the display to confirm the mode.
- Set mode to AC current (A~) for live current measurement
- Choose DC current (A—) if your meter supports it
- Select voltage (V) to measure electrical potential
- Pick resistance (Ω) for checking circuit resistance
Attaching Test Leads Correctly
Insert the test leads into the right ports on your clamp meter. Usually, the black lead goes into the common (COM) port.
The red lead goes into the port marked for voltage, resistance, or current, depending on your test.
- Black lead: plug into COM port
- Red lead: plug into V/Ω port for voltage or resistance
- Red lead: plug into A port for current measurement if needed
- Check leads for damage before use
Measuring Current With A Clamp Meter
A clamp meter is a useful tool to measure electrical current without disconnecting wires. It works by clamping around a conductor and sensing the magnetic field created by the current.
This method is safe and quick for checking current in live circuits. Understanding how to position the clamp and read measurements is important for accurate results.
Positioning The Clamp
Place the clamp meter jaws around only one conductor at a time. Do not clamp around multiple wires together or a cable with several conductors.
- Open the clamp jaws fully before placing around the wire.
- Ensure the conductor is centered inside the clamp for best accuracy.
- Keep the clamp steady and avoid moving it during measurement.
- Do not let other wires touch the clamp jaws during the test.
Reading Ac Vs Dc Current
Clamp meters can measure both AC and DC current, but they use different methods for each type. Most clamp meters measure AC current by detecting the magnetic field.
To read DC current, the meter may use a Hall effect sensor inside the clamp. Make sure to set the meter to the correct mode before measuring.
| Current Type | Measurement Method | Meter Setting |
| AC Current | Magnetic field detection | Set to AC mode |
| DC Current | Hall effect sensor | Set to DC mode |
Tips For Accurate Current Measurement
- Always zero the meter before measuring to remove any residual reading.
- Measure current on a single conductor only, not on cable bundles.
- Avoid measuring near strong magnetic fields or metal objects that may affect readings.
- Hold the clamp meter steady and avoid twisting the wire during measurement.
- Check the meter’s battery level and calibration regularly.
Measuring Voltage And Resistance
A clamp on multimeter can measure different electrical values. You can check voltage and resistance easily with it. This guide shows how to do that safely.
Knowing how to use the multimeter correctly helps you get accurate results. Follow simple steps to measure voltage and resistance.
Switching To Voltage Mode
Turn the dial on the multimeter to the voltage setting. Choose AC or DC voltage based on what you need to measure. AC is for outlets, and DC is for batteries.
Make sure the multimeter is off before changing the mode. This prevents damage to the device and keeps you safe.
Using Test Leads For Voltage
Connect the black test lead to the common (COM) port. Plug the red test lead into the voltage (V) port. Hold the leads by the insulated handles.
Touch the test leads to the circuit points where you want to measure voltage. The display shows the voltage reading. Do not touch the metal tips during testing.
- Black lead goes to COM port
- Red lead goes to V port
- Hold insulated handles only
- Touch test points carefully
Checking Resistance Safely
Turn off power to the circuit before measuring resistance. This avoids damage to the multimeter and incorrect readings. Set the dial to the resistance (Ω) symbol.
Connect the test leads like you do for voltage. Touch the leads across the component or wire. The display will show the resistance value.
- Power off the circuit
- Set dial to resistance (Ω)
- Use test leads on component ends
- Read the value on the screen
Advanced Functions And Settings
Clamp on multimeters have many advanced features. These help you get more detailed and accurate readings. Learning these settings can improve your measuring skills.
This guide covers Data Hold and Min/Max modes, measuring frequency and temperature, and auto-ranging features. Each function helps you work smarter and faster.
Using Data Hold And Min/max Modes
Data Hold freezes the current reading on the display. This is useful when you cannot see the screen while testing. Min/Max mode records the lowest and highest values during measurement.
- Data Hold:Press the hold button to freeze the number on the screen.
- Min Mode:Shows the smallest value recorded since activation.
- Max Mode:Shows the largest value recorded since activation.
- Use Cases:Track changing signals or capture peak values.
Measuring Frequency And Temperature
Clamp on multimeters can measure electrical frequency and temperature with special settings. Frequency is the number of cycles per second in a signal. Temperature measurement needs a probe accessory.
| Function | How to Use | Tip |
| Frequency | Select frequency mode, clamp on wire, read Hz value. | Use for motors and AC signals. |
| Temperature | Attach temperature probe, select °C or °F mode, read value. | Check device specs for probe type. |
Understanding Auto-ranging Features
Auto-ranging lets the multimeter choose the correct measurement scale. This makes testing faster and reduces errors. You do not need to guess the range before measuring.
- Auto-ranging adjusts the scale automatically for voltage, current, and resistance.
- It improves accuracy by using the best range for the signal.
- Manual range selection is available for expert users.
- Turn off auto-range if you want fixed scale readings.
Common Mistakes To Avoid
Using a clamp on multimeter can be tricky. Many users make simple mistakes that affect accuracy. Here are some common pitfalls to watch out for.
Understanding these mistakes helps you get better readings. Learn how to avoid them for safer and more accurate measurements.
Incorrect Clamp Positioning
Positioning the clamp wrong can lead to errors. Always place the clamp around one conductor at a time.
Clamping around multiple wires will give you incorrect readings. Ensure the clamp is fully closed for accurate results.
Ignoring Safety Precautions
Safety is crucial when using a multimeter. Always wear protective gear, like gloves and goggles.
Check the device for damage before use. Ensure the multimeter is set to the correct measurement type to prevent accidents.
Misinterpreting Display Readings
Reading the display wrong can lead to bad decisions. Make sure you understand the units shown on the multimeter.
Pay attention to decimal points and measurement scales. Double-check your settings to ensure accuracy.
- Read the manual for display symbols
- Practice with known values
- Compare readings with other tools
Maintaining Your Clamp Meter
Clamp meters are essential for measuring electrical current. Keeping them in top shape ensures they work accurately.
Regular maintenance extends the life of your clamp meter. Follow these tips for optimal performance.
Cleaning And Storage Tips
Proper cleaning and storage of your clamp meter are important. They help prevent damage and maintain accuracy.
Use a soft cloth to wipe off dust and dirt. Avoid using harsh chemicals that might damage the device.
- Store in a dry, cool place to avoid moisture damage
- Keep away from direct sunlight and extreme temperatures
- Use a protective case for added safety
Battery Replacement
Batteries power your clamp meter. Replacing them on time ensures consistent performance.
Check the battery level regularly. Replace them when the meter shows low battery warnings.
- Use the recommended battery type
- Always turn off the device before replacing batteries
- Dispose of used batteries properly
Regular Calibration Checks
Calibration checks are important for accurate readings. Regularly calibrate your clamp meter to ensure precision.
Follow the manufacturer's instructions for calibration. You can also consult a professional if needed.
- Check calibration annually or as recommended
- Use a known reference for comparison
- Document calibration dates and results
Credit: mestekinstruments.com
Frequently Asked Questions
What Is A Clamp On Multimeter Used For?
A clamp on multimeter measures current without disconnecting wires. It’s ideal for quick, safe electrical testing in circuits.
How Do You Measure Current With A Clamp Meter?
Open the clamp and place it around one conductor. The meter detects magnetic fields to display the current flow.
Can Clamp Meters Measure Voltage And Resistance?
Yes, many clamp meters also measure voltage, resistance, and continuity, making them versatile for various electrical diagnostics.
Is A Clamp Meter Safer Than A Regular Multimeter?
Yes, clamp meters reduce shock risk by measuring current without direct contact with live wires.
Conclusion
Using a clamp on multimeter helps check electrical currents safely. Clamp it around a wire without cutting or touching it. Always read the display carefully to understand the measurements. Practice often to feel confident and avoid mistakes. Keep the device clean and store it properly after use.
This tool saves time and keeps you safe while working with electricity. Try these steps to make your measurements easy and accurate. Simple, safe, and effective.