Wiring outlets in your garage workshop can seem tricky, but it doesn’t have to be. Learning how to safely wire outlets in your garage workshop is the key to powering your tools while avoiding costly or dangerous mistakes.
You’ll learn simple steps to install outlets that keep you protected from electrical hazards. By the end, you’ll feel confident handling your wiring project without stress or confusion.
Keep reading to discover how to make your garage workshop both functional and safe.
Planning Your Garage Wiring
Wiring outlets in your garage workshop needs careful planning. You must understand the power needs and layout before starting.
Good planning helps keep your workshop safe and efficient. It also prevents electrical issues later on.
Assessing Power Needs
First, list all the tools and devices you will use. Check their power ratings to know how much electricity each needs.
- Power tools like drills and saws
- Lighting fixtures for good visibility
- Charging stations for batteries
- Heating or cooling devices if needed
- Any other electrical equipment
Choosing The Right Circuit Breaker
Select a circuit breaker that can handle your total power load. It protects your wiring and devices from overload.
| Power Load (Watts) | Recommended Breaker Size (Amps) |
| Up to 1500 | 15 |
| 1501 to 3000 | 20 |
| 3001 to 4500 | 30 |
| 4501 to 6000 | 40 |
Make sure the breaker matches the wire size and type you plan to use. Consult an electrician if unsure.
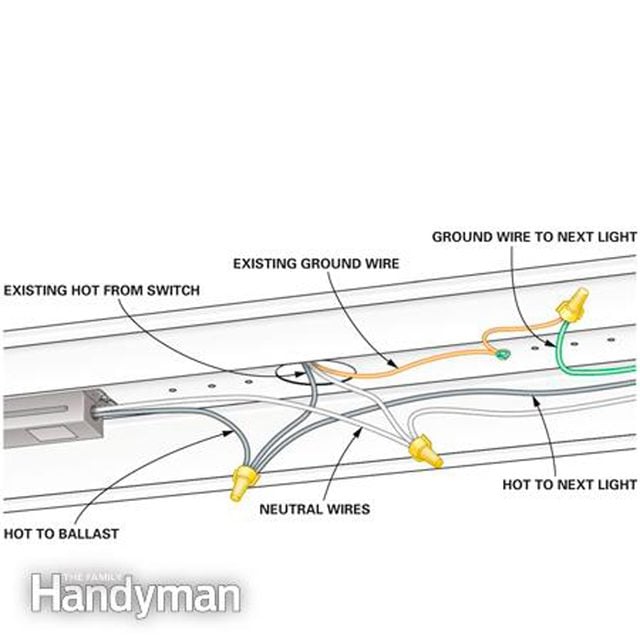
Mapping Outlet Locations
Decide where to place outlets for easy access. Spread them evenly to avoid using many extension cords.
- Near workbenches for tools
- At different heights for convenience
- Away from water sources for safety
- Close to lighting fixtures if needed
- Consider future equipment needs

Credit: www.familyhandyman.com
Selecting Materials And Tools
Wiring outlets safely in your garage workshop starts with choosing the right materials and tools. Using proper supplies helps avoid hazards and makes your work easier.
This guide covers types of wiring, outlet boxes, and essential tools you need for a safe and effective setup.
Types Of Wiring And Cables
Select wires that can handle the electrical load of your workshop tools. Most garages need 12-gauge or 14-gauge wiring. Use cables rated for indoor use and protected from moisture.
- NM-B (Romex) cable for dry, indoor areas
- UF-B cable for damp or underground sections
- THHN wires for conduit installations
- Ground wires for safety and fault protection
Outlet And Box Selection
Choose outlet boxes that fit the wiring method and location. Metal boxes are sturdy and used with conduit wiring. Plastic boxes work well with NM cables in dry areas.
| Box Type | Material | Best Use |
| Standard Outlet Box | Plastic | Dry, indoor walls |
| Metal Outlet Box | Steel | Conduit wiring, garages |
| Weatherproof Box | Plastic or Metal | Damp or outdoor locations |
| Deep Outlet Box | Plastic or Metal | Extra space for wiring |
Essential Tools For Wiring
Having the right tools makes wiring safer and faster. Make sure to use tools designed for electrical work to avoid accidents.
- Wire strippers to remove insulation without damage
- Voltage tester to check live wires
- Fish tape for pulling wires through walls
- Needle-nose pliers for bending and twisting wires
- Screwdrivers with insulated handles
- Circuit tester to verify outlet wiring
Preparing The Workspace
Wiring outlets in your garage workshop requires a clean and safe workspace. Preparing the area helps avoid accidents and makes the job easier. This guide covers key steps to get your workspace ready.
Focus on safety first and organize the area well. This preparation will help you work efficiently and protect yourself during the wiring process.
Ensuring Safety Precautions
Safety is the top priority when wiring outlets. Wear protective gear like gloves and safety glasses. Keep a fire extinguisher nearby and make sure you have good lighting in the workspace.
- Wear insulated gloves and eye protection
- Keep a fire extinguisher within reach
- Use proper lighting to see clearly
- Do not work alone if possible
- Keep tools organized and in good condition
Turning Off Power
Always turn off the power before starting wiring. Locate your main breaker panel and switch off the breaker that controls the garage. Use a voltage tester to confirm the power is off.
| Step | Action |
| 1 | Find the main breaker panel |
| 2 | Switch off the garage circuit breaker |
| 3 | Use a voltage tester to check for power |
| 4 | Ensure all outlets in the garage are off |
Clearing And Organizing The Area
Clear the garage area around your work zone. Remove any clutter, tools, or materials that could block your movement or cause trips. Organize your tools for easy access.
- Arrange tools on a pegboard or table
- Group similar tools together
- Keep wires and cables untangled
- Store sharp tools safely
Credit: www.familyhandyman.com
Step-by-step Wiring Process
Wiring outlets in your garage workshop needs care and attention. Follow each step to keep the work safe and effective.
This guide covers running cables, installing boxes, connecting wires, and testing connections.
Running Electrical Cables
Start by planning the cable routes from the main panel to each outlet location. Avoid sharp bends and keep cables away from water sources.
Use staples or cable clips to secure cables every 12 inches. Leave extra cable length at each outlet box for wiring.
Installing Outlet Boxes
Mount outlet boxes at a comfortable height for use. Use boxes rated for your cable type and location.
- Mark the wall where each box will go
- Cut the drywall carefully
- Secure boxes firmly to studs or wall anchors
- Ensure boxes sit flush with the wall surface
Connecting Wires To Outlets
Strip about ¾ inch of insulation from each wire. Connect the black (hot) wire to the brass terminal, white (neutral) to silver, and green or bare (ground) to the green terminal.
| Wire Color | Connection Point |
|---|---|
| Black (Hot) | Brass Terminal |
| White (Neutral) | Silver Terminal |
| Green/Bare (Ground) | Green Terminal |
Tighten all screws and gently push wires into the box before securing the outlet.
Securing And Testing Connections
After wiring, secure the outlet cover plate. Turn on the power and test each outlet with a voltage tester.
- Turn off the main power before starting
- Use a voltage tester to check for live wires
- Test each outlet for proper voltage
- Fix any loose connections before use
Safety Measures And Code Compliance
Wiring outlets in your garage workshop needs careful attention. Safety and following rules keep you and your tools safe.
Understanding safety steps and electrical codes helps prevent accidents. It also ensures your work meets legal standards.
Ground Fault Circuit Interrupters (gfcis)
GFCIs protect you from electric shocks. They stop power if they detect a problem in the circuit.
Install GFCI outlets in your garage. They are needed where water or moisture is common.
- Test GFCIs monthly to ensure they work.
- Replace any GFCI that does not trip during testing.
- Use GFCIs on all garage outlets near sinks or water sources.
Proper Grounding Techniques
Grounding provides a safe path for electricity in faults. It reduces the risk of shocks or fires.
Connect the outlet’s ground wire to the main grounding system. Use proper grounding rods or metal pipes as guides.
- Use a green or bare copper wire for grounding.
- Check that grounding connections are tight and secure.
- Do not connect ground wires to water pipes unless allowed by code.
Following Local Electrical Codes
Local codes set rules for safe electrical work. They cover wiring methods, outlet placement, and breaker sizes.
Contact your local building department before starting. Get permits and inspections as required.
- Use the right wire size for your circuit.
- Install outlets at proper heights and distances.
- Label your electrical panel clearly.
- Follow rules about breaker types and ratings.
Troubleshooting Common Issues
Wiring outlets in your garage workshop can be tricky. Sometimes, problems arise that need fixing. Here's how to handle common issues.
Understanding these problems ensures your workshop stays safe and functional. Let's explore solutions for common wiring issues.
Dealing With Loose Connections
Loose connections can cause outlets to malfunction. They might even spark a fire. It's crucial to fix them quickly.
Check the screws on the outlet. Tighten any that are loose. Ensure wires are snugly connected to the terminals.
- Turn off the power before inspecting
- Use a screwdriver to tighten screws
- Double-check wire positioning
Handling Tripped Breakers
Tripped breakers can stop power from reaching your outlets. This can halt your work. Resetting them is usually simple.
First, find the breaker box. Look for any switches that aren't aligned. Flip them back to restore power.
- Identify the tripped breaker
- Switch it off, then back on
- Check if power is restored
Identifying Faulty Outlets
Sometimes outlets stop working. This can be due to internal faults. Identifying these issues is key to fixing them.
Use a multimeter to test the outlet. If it shows no power, the outlet might be faulty. Consider replacing it.
- Test with a multimeter
- Check for visible damage
- Replace if necessary
Maintenance Tips For Longevity
Keeping your garage workshop's outlets in good shape is important. This ensures safety and prolongs their life.
Regular care and checks help prevent problems. Here are some tips to maintain your outlets.
Regular Inspections
Check your outlets often for wear and tear. Look for cracks or discoloration. These can be signs of damage.
Testing the outlets with a voltage tester is a good idea. This ensures they are working properly.
- Inspect outlets every six months
- Look for loose or broken parts
- Use a tester to check voltage
Upgrading Outlets When Needed
Sometimes, outlets need an upgrade. Older outlets may not handle modern tools well. This can cause issues.
Consider installing GFCI outlets. These reduce the risk of electric shocks in damp areas.
- Replace outlets older than 10 years
- Install GFCI outlets in damp areas
- Ensure new outlets match your power needs
Preventing Overloads
Overloading outlets can be dangerous. It may lead to fires or damage to your tools. Spread the load across multiple outlets.
Use power strips with surge protectors. These help manage the electrical load safely.
- Avoid plugging too many devices into one outlet
- Use power strips with surge protection
- Check the amp rating of your outlets
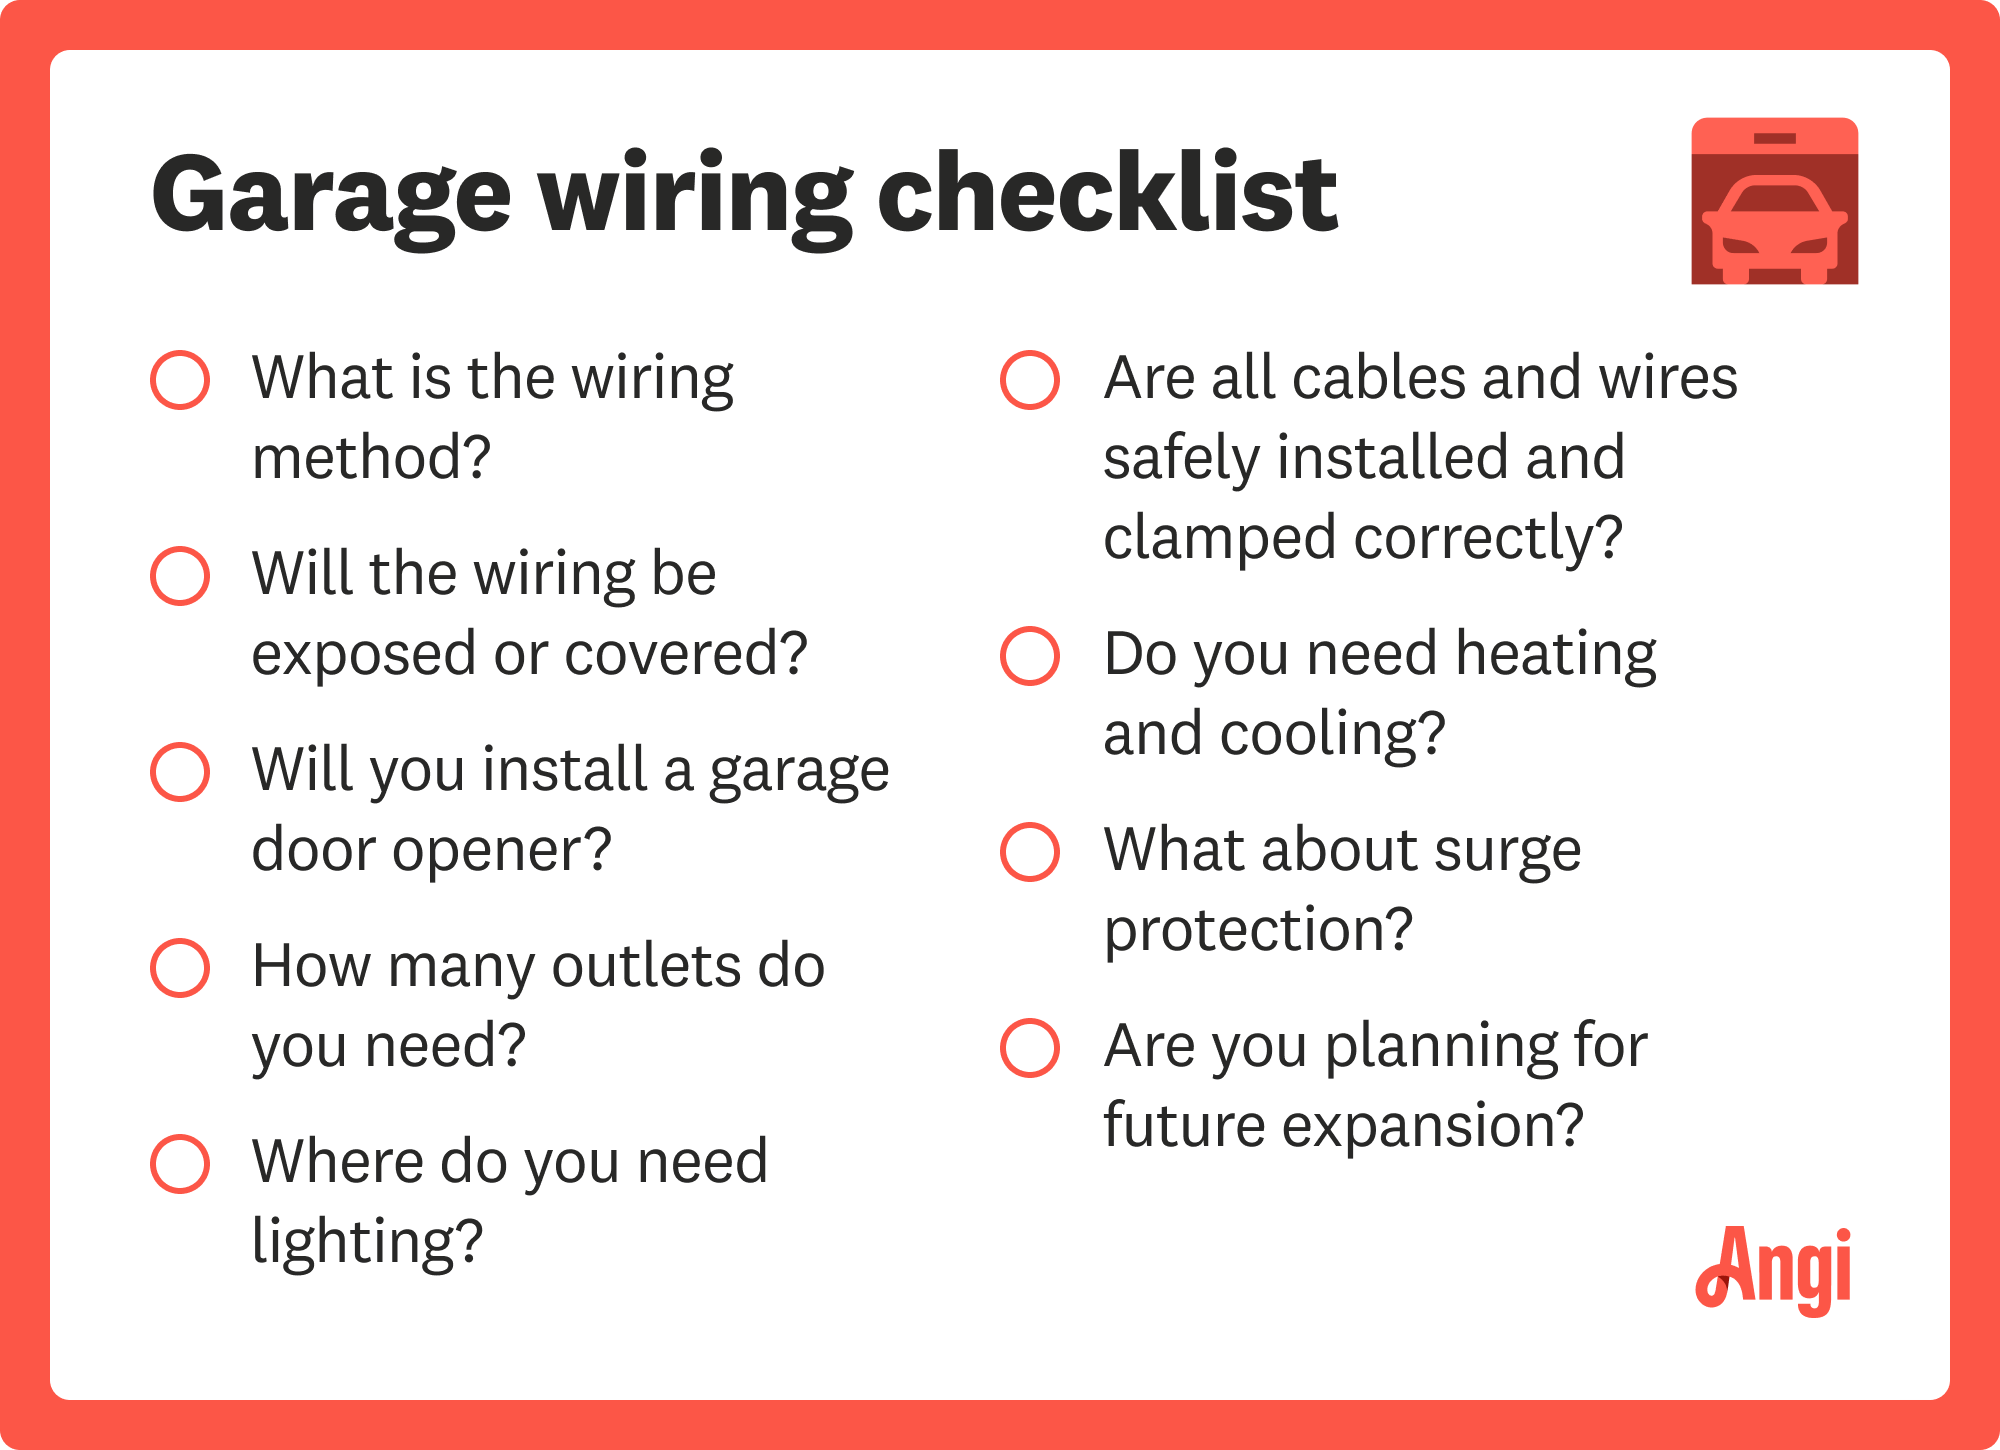
Credit: www.angi.com
Frequently Asked Questions
How Do I Choose The Right Outlet For My Garage Workshop?
Select outlets rated for 15 or 20 amps with weather-resistant features. Use GFCI outlets to prevent electrical shocks in damp areas.
What Tools Are Essential For Wiring Garage Outlets Safely?
You need wire strippers, voltage testers, screwdrivers, pliers, and a drill. Always use insulated tools for added safety during wiring.
Can I Wire Multiple Outlets On One Circuit In My Garage?
Yes, but ensure the circuit capacity matches total outlet load. Avoid overloading to prevent tripped breakers and fire hazards.
Why Should I Install Gfci Outlets In The Garage?
GFCI outlets protect against electric shock by shutting off power during faults. They are crucial in garages due to moisture exposure.
Conclusion
Wiring outlets in your garage workshop can be safe and simple. Always follow electrical codes and use the right tools. Double-check your work to avoid hazards. Take your time and stay focused. Don’t rush the process or skip steps. Safety protects you and your tools.
With care, your workshop will have reliable power. Enjoy your projects without worry. Keep learning and improving your skills. Small steps lead to great results.