

Have you ever tried to remove a drywall anchor and ended up with a bigger mess than you started with? You’re not alone.
Removing drywall anchors can be tricky if you don’t know the right steps. But don’t worry—this guide will show you simple, effective ways to get those anchors out cleanly, without damaging your walls. Keep reading, and you’ll learn easy tricks that save you time, effort, and frustration.
Your walls will thank you!

Credit: www.reddit.com
Types Of Drywall Anchors
Drywall anchors help hold items on walls without studs. They come in different types for various uses. Knowing the types helps you pick the right one.
This guide explains four common drywall anchors. Each type has a unique design and removal method.
Plastic Expansion Anchors
Plastic expansion anchors are simple and cheap. You drill a hole, push in the anchor, then insert a screw. The anchor expands behind the drywall to hold tight.
They work well for light loads like small pictures or shelves.
Self-drilling Anchors
Self-drilling anchors have sharp tips. You do not need to drill a hole first. Screw them directly into drywall. They create their own hole as they go in.
- Made from metal or plastic
- Hold better than plastic expansion anchors
- Good for medium weight items
Toggle Bolts
Toggle bolts use a spring-loaded wing. You push the wings through a drilled hole. They open behind the drywall and clamp it tight. This gives strong hold for heavy items.
| Feature | Details |
| Material | Metal |
| Best for | Heavy objects like shelves or TVs |
| Installation | Drill hole, insert bolt with wings folded |
| Removal | Unscrew bolt and pull out wings |
Molly Bolts
Molly bolts are metal anchors with a sleeve. You insert them into a hole and tighten the screw. The sleeve expands behind the wall, locking it in place.
They hold medium to heavy loads and can be removed and reused.
- Provide strong, stable support
- Work well in hollow walls
- Require pre-drilling a hole
- Can be removed by unscrewing and pulling gently
Tools Needed For Removal
Removing a drywall anchor can be easy with the right tools. Here are the tools you will need for a successful removal.
Screwdriver Options
Screwdrivers are essential for removing the screw part of the anchor. You can use either a flathead or a Phillips screwdriver, depending on the type of screw used.
- Flathead screwdriver
- Phillips screwdriver
Pliers And Wrenches
Pliers can help grip the anchor body firmly. Wrenches may be useful if the anchor is tightly fitted.
- Needle-nose pliers
- Adjustable wrench
Utility Knife
A utility knife can score the paint or drywall around the anchor. This prevents damage to the wall surface.
Make sure the blade is sharp for clean cuts.
Drill And Bits
A drill can help remove stubborn anchors. Use a bit slightly larger than the anchor to drill it out.
- Cordless drill
- Drill bits
Removing Plastic Expansion Anchors
Plastic expansion anchors help hold screws in drywall securely. Removing them takes care to avoid damage. Follow simple methods to remove these anchors safely.
This guide covers how to unscrew, pry out, and patch holes from plastic anchors.
Unscrewing The Anchor
Sometimes the anchor can be removed by unscrewing the attached screw first. Use a screwdriver that fits the screw head well. Turn counterclockwise to loosen the screw.
Once the screw is out, try to pull the anchor out gently. If it does not move, try the next method.
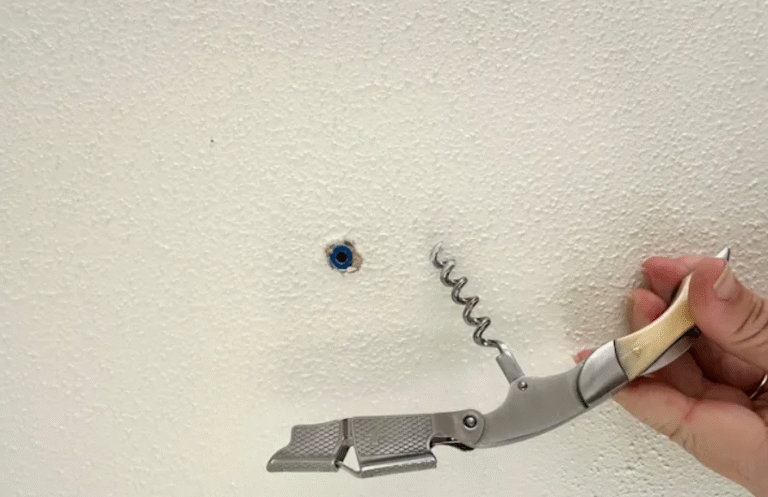
Prying Out With Pliers
If unscrewing does not work, use pliers to pull the plastic anchor out. Grip the anchor firmly with needle-nose pliers. Pull straight out to avoid widening the hole.
- Grip the anchor close to the wall surface.
- Pull gently but firmly to avoid breaking the anchor.
- If the anchor breaks, remove pieces carefully.
- Use a putty knife to pry if needed.
Patching Small Holes
After removing the anchor, you may see a small hole. You can patch it with simple tools and materials.
| Material | Purpose |
| Spackling paste | Fill the hole |
| Putty knife | Spread the paste evenly |
| Sandpaper | Smooth the dried patch |
| Paint | Match the wall color |
First, apply spackling paste with a putty knife. Let it dry fully. Then sand lightly to smooth the surface. Finally, paint to match your wall color.
Credit: www.familyhandyman.com
Removing Self-drilling Anchors
Self-drilling anchors help hold items on drywall securely. Removing them can be tricky but is possible with the right steps.
This guide explains how to remove these anchors without damaging your wall.
Backing Out The Screw
Start by turning the screw inside the anchor counterclockwise. This loosens the anchor’s grip on the drywall.
Remove the screw completely before trying to take out the anchor itself.
Twisting The Anchor Out
Use pliers to grip the anchor’s collar. Twist it slowly to pull it out of the drywall.
Be careful not to break the wall. Keep twisting until the anchor comes free.
- Grip anchor with needle-nose pliers
- Turn anchor counterclockwise gently
- Pull anchor out while twisting
Dealing With Stubborn Anchors
If the anchor won’t come out, push it into the wall cavity. Use a screwdriver to tap it gently.
After pushing it in, patch the hole with spackle or drywall compound to fix the surface.
- Try pushing anchor into wall cavity
- Use a screwdriver and hammer carefully
- Fill hole with spackle after removal
Removing Toggle Bolts
Toggle bolts hold heavy items to drywall using a spring-loaded wing. Removing them needs care to avoid wall damage. Follow these simple steps to remove toggle bolts safely.
This guide explains how to unscrew the bolt, retrieve the toggle, and handle any large holes left behind.
Unscrewing The Bolt
Start by unscrewing the bolt from the toggle. Use a screwdriver that fits the bolt head well. Turn it counterclockwise to loosen.
If the bolt spins without loosening, hold the toggle inside the wall with needle-nose pliers. This stops the toggle from turning while you unscrew the bolt.
Retrieving The Toggle
Once the bolt is out, the toggle may fall inside the wall. Try to pull it out gently with pliers. If it is stuck deep inside, push it through the wall cavity.
- Use needle-nose pliers to grip the toggle.
- Pull carefully to avoid enlarging the hole.
- If unreachable, push it inside and patch later.
Handling Large Holes
Removing toggle bolts often leaves a large hole in drywall. Patch the hole to restore the wall’s look and strength.
| Material | Purpose |
|---|---|
| Drywall patch | Covers large holes |
| Joint compound | Fills gaps and smooths surface |
| Sandpaper | Prepares wall for painting |
| Primer and paint | Restores wall color |
Apply the patch, spread joint compound, and sand it smooth. Finally, paint the area to match your wall color.
Removing Molly Bolts
Molly bolts are strong anchors used in drywall to hold heavy items. Removing them can be tricky without damaging the wall.
This guide explains how to remove molly bolts safely in three clear steps.
Unscrewing The Bolt
First, use a screwdriver to turn the bolt counterclockwise. This loosens the bolt inside the anchor.
If the bolt spins without coming out, hold the anchor steady with pliers. This helps in turning the bolt fully out.
Collapsing The Sleeve
Next, the metal sleeve behind the wall needs to be collapsed. This frees the anchor from the drywall.
- Insert a flathead screwdriver behind the sleeve.
- Gently tap the screwdriver with a hammer to bend the sleeve inward.
- Be careful not to damage the drywall during tapping.
- Check if the sleeve is loose by lightly pulling the anchor.
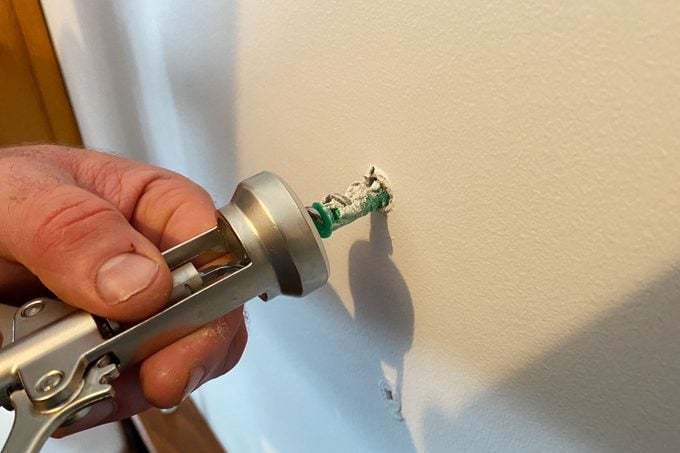
Pulling Out The Anchor
Finally, pull out the collapsed anchor from the wall. Use pliers if it does not come out by hand.
| Tool | Purpose |
|---|---|
| Screwdriver | Unscrew the bolt and collapse the sleeve |
| Hammer | Tap the screwdriver to bend the sleeve |
| Pliers | Hold anchor steady and pull it out |
Preventing Wall Damage
Removing drywall anchors can cause damage if not done carefully. Taking your time helps keep your walls smooth and clean.
Using the right tools and gentle methods lowers the risk of holes or cracks. Fixing small holes afterward keeps your wall looking good.
Using Proper Tools
Choose tools made for drywall work. A screwdriver, pliers, and a putty knife work well.
Avoid sharp or heavy tools that can break the wall surface. A drill with a screwdriver bit helps remove anchors carefully.
- Screwdriver for turning anchors
- Pliers to pull anchors gently
- Putty knife for filling holes
Working Slowly And Gently
Take your time when removing anchors. Pull or twist them slowly to avoid tearing the drywall.
If an anchor resists, stop and try loosening it with a screwdriver. Quick force can cause big holes or cracks.
- Twist anchors gently to loosen
- Pull anchors with steady pressure
- Stop if wall starts to crack
Filling And Sanding Holes
After removing anchors, fill holes with spackling or wall putty. Use a putty knife to spread it evenly.
Let the filler dry fully. Then sand the area smooth to blend with the wall surface before painting.
- Apply spackling to holes
- Wait for drying time
- Sand gently for a smooth finish
Repairing Walls After Removal
Removing a drywall anchor leaves holes that need fixing. Proper repair keeps your walls smooth and ready for painting.
This guide helps you choose spackle, apply it, and finish with sanding and painting.
Choosing The Right Spackle
Select spackle based on hole size and drying time. Lightweight spackle works well for small holes.
- Use lightweight spackle for holes smaller than 1 inch.
- Choose all-purpose spackle for medium holes.
- For large holes, use patching compound or drywall repair kits.
- Check the drying time to fit your schedule.
Applying Spackle Smoothly
Apply spackle evenly to avoid bumps. Use a putty knife to fill the hole completely.
- Press spackle into the hole with the putty knife.
- Spread it beyond the hole to blend with the wall.
- Remove extra spackle by scraping gently.
- Let the spackle dry fully before sanding.
Sanding And Painting Tips
Sanding smooths the patched area. Painting hides the repair and restores the wall’s look.
| Task | Tip |
| Sanding | Use fine-grit sandpaper and sand lightly in circles. |
| Painting | Match paint color and apply thin coats for even coverage. |
| Drying | Allow paint to dry completely before touching the wall. |

Credit: www.reddit.com
Frequently Asked Questions
How Do I Safely Remove A Drywall Anchor?
To safely remove a drywall anchor, first unscrew any attached screws. Use pliers to grip and pull the anchor gently. If it resists, push it through the wall or patch the hole afterward for a clean finish.
What Tools Are Best For Removing Drywall Anchors?
The best tools for removing drywall anchors are pliers, a screwdriver, and a utility knife. Pliers help grip the anchor, while a screwdriver removes screws. A utility knife cleans around the hole for smooth patching.
Can Drywall Anchors Damage My Wall During Removal?
Drywall anchors can cause minor damage if pulled forcefully. Removing them gently reduces damage risk. You may need to patch and repaint the wall after removal for a seamless look.
How Do I Patch Holes After Removing Drywall Anchors?
To patch holes, clean the area and apply spackle or joint compound. Let it dry, sand smooth, and repaint. This restores the wall to its original appearance quickly and easily.
Conclusion
Removing drywall anchors can be simple with the right steps. Take your time and use basic tools for best results. Avoid damaging the wall by pulling or twisting gently. Repair any small holes with spackle and sand smooth. Soon, your wall will look clean and ready for new fixtures.
Practice makes the process easier and less stressful. Keep these tips handy for future DIY projects.

