

Are you planning to set up or upgrade the electrical system in your home? Understanding an electrical wiring diagram for your house is the key to making the process smoother and safer.
Imagine having a clear map that shows exactly where every wire, switch, and outlet should go—saving you time, money, and headaches. You’ll discover how to read and use these diagrams with confidence, even if you’re not an expert. Keep reading, and you’ll gain the knowledge to take control of your home’s wiring like a pro.
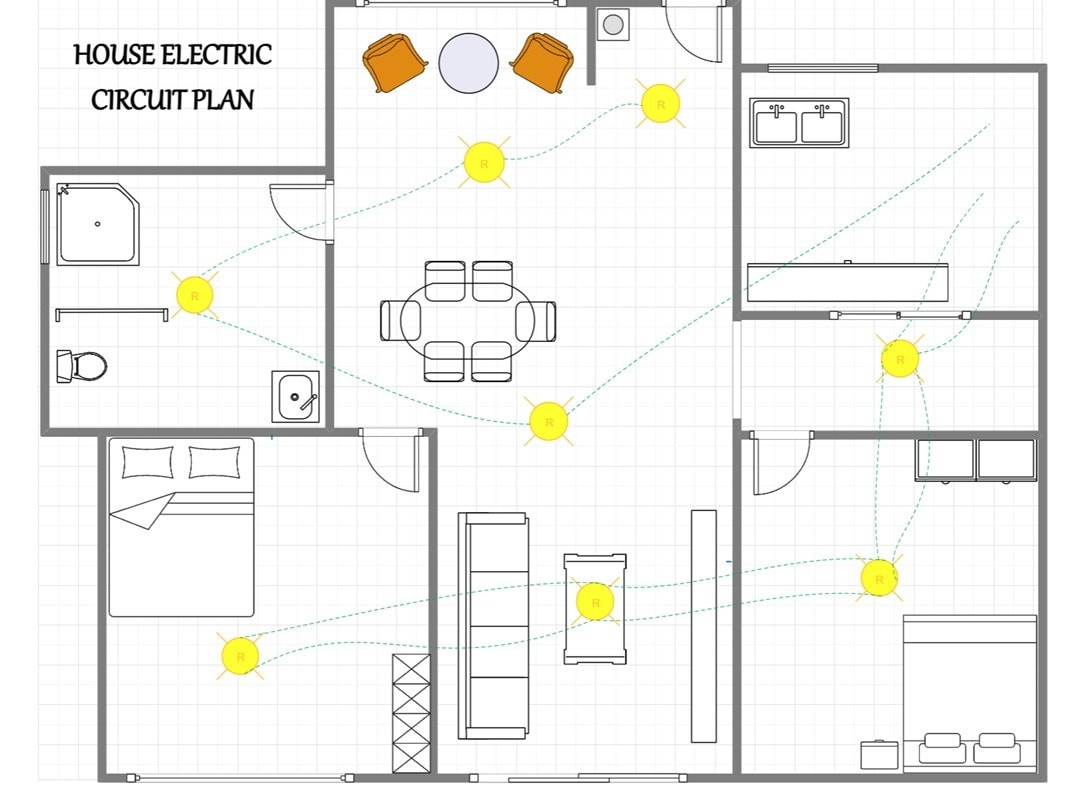
Credit: edrawmax.wondershare.com
Basics Of Home Electrical Wiring
Understanding the basics of home electrical wiring is essential for anyone looking to maintain or upgrade their house safely and efficiently. Electrical wiring forms the backbone of your home's power system, connecting outlets, switches, and fixtures to the main power supply. Knowing how it works can help you spot issues early, avoid costly mistakes, and even save on electrician fees.
Key Components
Your home’s electrical system relies on a few critical parts that work together seamlessly. The circuit breaker panelacts as the control center, distributing power to various circuits and shutting off electricity if something goes wrong. Wirescarry electricity from the panel to outlets, lights, and appliances.
Don’t forget the outlets and switches, which give you access to power and control over your lighting and devices. Lastly, grounding wiresare vital for safety, directing excess electricity safely into the ground to prevent shocks or fires.
Common Wiring Types
Not all wires are created equal. Most homes use non-metallic (NM) cable, often called Romex, which is easy to install and suitable for dry, indoor locations. You’ll also find armored cable (AC)in some areas, offering extra protection with a metal covering.
For outdoor or underground wiring, underground feeder cable (UF)is common because it’s water-resistant. Understanding these types helps you choose the right wire for each part of your home, ensuring durability and safety.
Safety Standards
Electrical safety isn’t optional—it’s a must. The National Electrical Code (NEC)sets the rules for wiring in the US, covering everything from wire size to installation methods. Following these standards reduces risks of electrical fires and shocks.
Always use the correct wire gauge for your circuit to prevent overheating. And never overlook the importance of properly grounding your system. Have you ever wondered why some outlets have a third hole? That’s the grounding slot, a simple but crucial safety feature.
Reading Electrical Wiring Diagrams
Reading electrical wiring diagrams is essential for understanding house wiring layouts. These diagrams show how electrical components connect and interact. They help identify circuits, switches, outlets, and other key elements. Learning to read these diagrams can make repairs and installations safer and more efficient.
Symbols And Labels
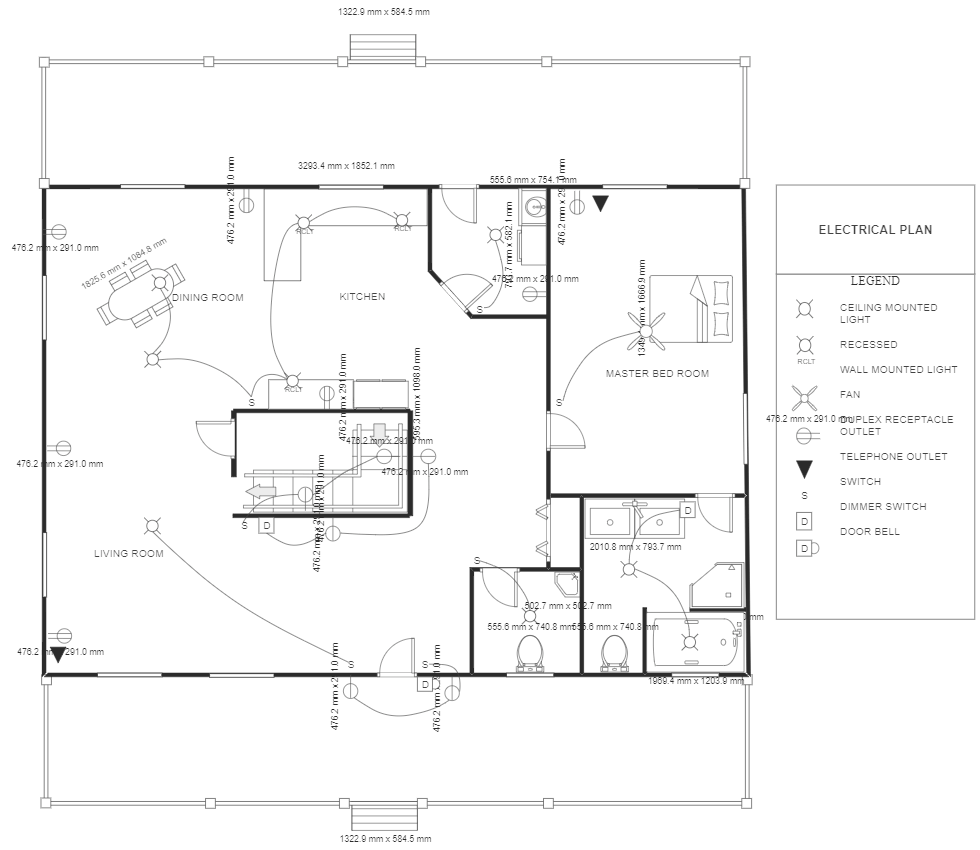
Symbols represent different electrical parts in the diagram. Common symbols include outlets, switches, lights, and wires. Labels provide extra information like voltage or wire size. Knowing these symbols and labels lets you quickly identify components. A legend or key often accompanies the diagram for easy reference.
Circuit Paths
Circuit paths show the flow of electricity through the house wiring. Lines represent wires connecting different components. Solid lines usually indicate live wires, while dashed lines might show neutral or ground wires. Following the circuit paths helps understand how power travels from the main panel to devices.
Interpreting Connections
Connections show where wires join or split. Dots or junctions mark these points on the diagram. Crossed lines without dots mean wires do not connect. Understanding these connections helps prevent wiring errors. Proper interpretation ensures safe and functional electrical systems.
Planning Your Home Wiring Setup
Planning your home wiring setup is a crucial step that sets the foundation for a safe and efficient electrical system. Thoughtful planning helps avoid costly mistakes and ensures your home's electrical needs are met both now and in the future. Before you start drilling holes or pulling cables, take time to map out exactly what your home requires.
Assessing Electrical Needs
Start by listing all the electrical devices and appliances you use daily. Think beyond the basics—consider smart home devices, chargers, kitchen gadgets, and even outdoor lighting. Each device adds to the total power demand, so knowing what you'll plug in helps you plan the right circuit capacity.
Ask yourself: will you need extra outlets in certain rooms? Do you have plans to add heavy-duty appliances like an electric oven or HVAC system? This step is about understanding your home's unique requirements, not guessing.
Load Distribution
Proper load distribution prevents circuit overloads and keeps your system running smoothly. Divide your home into zones—kitchen, living room, bedrooms—and assign circuits based on the power needs of each area. High-demand appliances like microwaves or air conditioners should have dedicated circuits.
Think about how many outlets and switches each zone requires. You might want to create a simple chart to visualize this, listing each room alongside its expected devices and required amperage. This helps you avoid overloading a single circuit and reduces the risk of frequent breaker trips.
Choosing The Right Materials
Selecting quality materials is vital for safety and durability. Use wiring that matches the electrical load—typically 14-gauge wire for lighting circuits and 12-gauge for outlets. Opt for copper wiring whenever possible due to its superior conductivity and reliability.
Don’t overlook the importance of proper circuit breakers and outlets rated for your system’s voltage. Cheap or mismatched components might save money upfront but can cause hazards later. Investing in trusted brands and certified products ensures your wiring setup will last and protect your home.
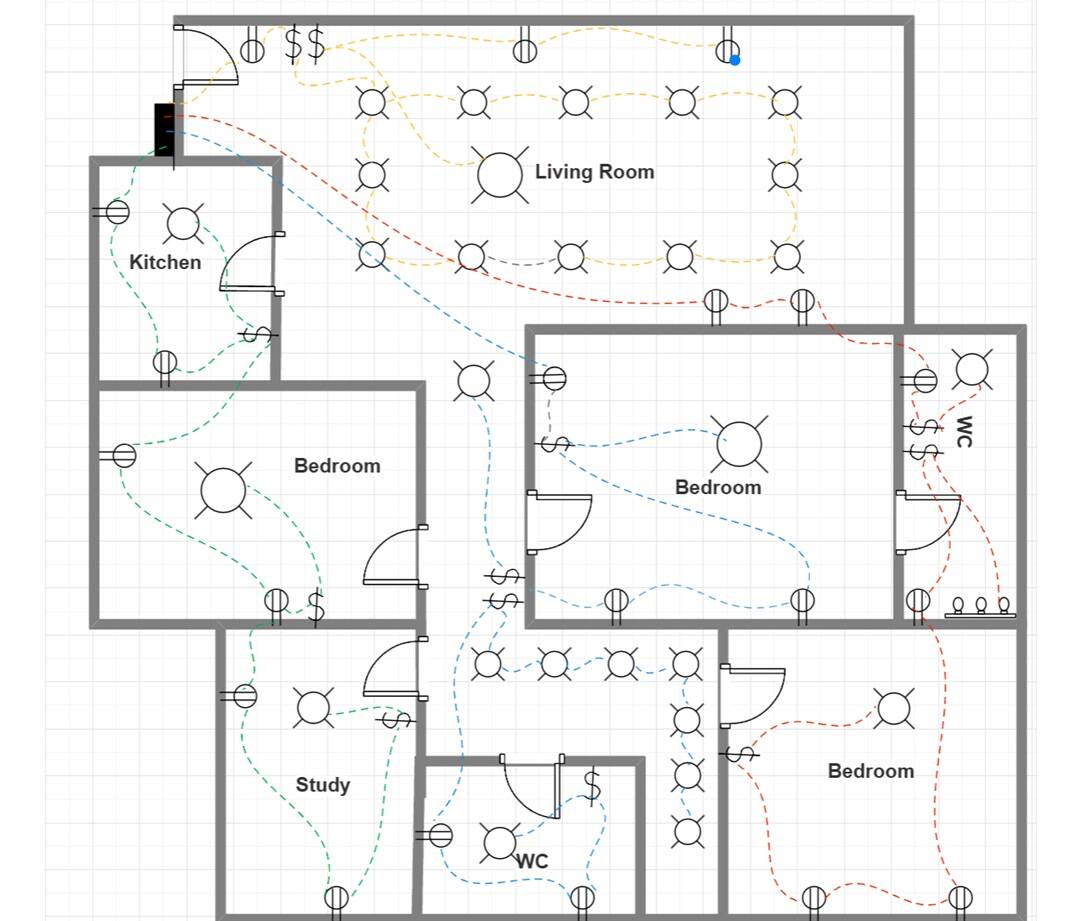
Credit: community.lucid.co
Step-by-step Wiring Diagram Creation
Creating an electrical wiring diagram for a house requires careful planning and clear visualization. This process helps ensure safe and efficient wiring throughout the home. A well-drawn diagram also simplifies future repairs or upgrades. Follow these steps to design a detailed and accurate wiring diagram.
Sketching The Layout
Begin by drawing the floor plan of the house. Include all rooms, doors, and windows. Use simple shapes to represent each area clearly. This layout forms the base for placing electrical components. Mark locations for lights, switches, and outlets roughly. Keep the sketch neat to avoid confusion later.
Marking Circuits And Outlets
Identify each circuit on the layout. Group outlets and lights that share the same circuit. Use symbols to represent switches, outlets, and fixtures. Add labels for circuit numbers or names. This step helps organize electrical flow and load distribution. Make sure to follow local wiring codes and standards.
Verifying The Diagram
Review the entire diagram carefully. Check each connection and symbol for accuracy. Confirm that circuits do not overload and follow safety rules. Use a checklist to ensure all components are included. Correct any mistakes before finalizing the diagram. This step prevents costly wiring errors and hazards.
Troubleshooting With Wiring Diagrams
Troubleshooting electrical issues in your home can feel overwhelming, but wiring diagrams are powerful tools that make the process clearer. These diagrams map out your home's electrical system, showing how circuits connect and where problems might hide. With a bit of guidance, you can use these diagrams to quickly find faults and fix them before they become bigger issues.
Identifying Faulty Circuits
Start by understanding what a faulty circuit looks like. Signs include flickering lights, outlets that don’t work, or breakers that trip often. Your wiring diagram helps you pinpoint which circuit corresponds to the problem area, saving you from guessing.
Imagine your kitchen lights keep going out. Instead of checking every outlet, the diagram shows you the exact circuit controlling those lights. This focused approach means you spend less time searching and more time fixing.
Using Diagrams To Locate Issues
Once you identify the circuit, use the wiring diagram to trace the path of wires and connections. Look for any breaks, loose connections, or burnt components along the line. Diagrams often include symbols for switches, outlets, and junctions, helping you spot where the flow of electricity might be interrupted.
If a breaker trips frequently, check the diagram to see what devices share that circuit. Overloading happens when too many devices draw power from the same line. The diagram can guide you on redistributing the load to avoid repeated trips.
Preventive Tips
- Keep your wiring diagram handy:Store a copy near your electrical panel for quick reference.
- Label circuits clearly:Mark each breaker with its corresponding area or device to reduce confusion.
- Regularly inspect connections:Loose or corroded wires can cause faults; use the diagram to check these points.
- Avoid overloading circuits:Use the diagram to balance your electrical load and prevent overheating.
Have you ever wondered how much time you could save by using a wiring diagram the next time your power acts up? These simple steps can empower you to handle small electrical problems confidently and keep your home safe.
Upgrading And Modifying Existing Wiring
Upgrading and modifying the electrical wiring in your house can feel overwhelming, but it’s essential for safety and functionality. Whether you want to add new outlets, switch to energy-efficient lighting, or fix outdated wiring, understanding your current setup is the first step. Let’s break down how to approach these changes thoughtfully and effectively.
Assessing Current Setup
Start by carefully examining your existing wiring diagram and physical wiring. Look for signs of wear like frayed cables, outdated fuse boxes, or inconsistent power flow. Sometimes, what seems like a minor flicker could point to a bigger issue hidden behind the walls.
Have you checked if your wiring matches the latest electrical standards? Older homes often have wiring that can’t handle modern appliances safely. A thorough assessment helps you avoid surprises during upgrades and ensures your system’s foundation is solid.
Incorporating New Fixtures
Adding new fixtures isn’t just about plugging them in. You need to confirm your current wiring can support additional load without overheating. Sometimes, adding a simple ceiling fan or smart lighting means upgrading circuits or adding dedicated lines.
When planning new fixtures, think about placement and accessibility. Will the new lights or outlets be convenient? Have you considered future needs, like charging stations or home offices? Proper planning saves you from costly rewiring later.
Ensuring Compliance
Electrical work must meet local building codes and safety regulations—this isn’t optional. Skipping compliance can lead to dangerous hazards or failed inspections when selling your home. It’s critical to check if your upgrades need permits or professional inspections.
Do you know the specific rules for your area? Some regions require licensed electricians for certain tasks. Staying informed protects you, your family, and your investment.
Tools And Resources For Diy Wiring
DIY electrical wiring requires the right tools and resources to ensure safety and success. Having proper equipment helps you work efficiently. Useful software and learning materials make the process easier. These elements guide beginners through complex wiring tasks.
Essential Tools
- Wire strippers for removing insulation cleanly
- Voltage tester to check live wires safely
- Multimeter for measuring voltage, current, and resistance
- Electrical tape to insulate wire connections
- Screwdrivers and pliers designed for electrical work
- Circuit breaker finder to identify specific breakers
- Fish tape for pulling wires through walls or conduits
Helpful Software
- Electrical diagram apps to create clear wiring plans
- Load calculators to estimate power requirements
- Circuit simulators for testing wiring setups virtually
- Project management tools for organizing tasks and materials
Learning Resources
- Online tutorials with step-by-step wiring instructions
- Video courses showing practical wiring techniques
- Electrical code guides to follow safety standards
- Forums and communities for asking expert advice
- Books explaining basics and advanced electrical concepts

Credit: www.youtube.com
Frequently Asked Questions
What Is An Electrical Wiring Diagram For A House?
An electrical wiring diagram shows how electrical circuits connect in a house. It helps with installation, repairs, and safety checks. The diagram includes outlets, switches, and fixtures, guiding electricians and homeowners to understand the wiring layout clearly.
Why Are House Wiring Diagrams Important?
House wiring diagrams ensure safe and efficient electrical system installation. They help avoid wiring mistakes, reduce risks of fire, and simplify troubleshooting. Diagrams also assist electricians in planning circuit layouts and complying with electrical codes.
How To Read A House Electrical Wiring Diagram?
To read a wiring diagram, identify symbols for outlets, switches, and fixtures. Follow lines representing wires connecting components. Understanding basic electrical symbols and circuit flow helps interpret the diagram accurately.
Can I Create A House Wiring Diagram Myself?
Yes, with basic knowledge of electrical symbols and circuits, you can draft a simple wiring diagram. Use software tools or graph paper to map outlets and switches. For complex systems, consult a professional electrician for accuracy and safety.
Conclusion
Understanding your house’s electrical wiring diagram helps keep things safe. It shows how wires connect to switches and outlets. Following the diagram makes installation easier and faster. Mistakes can cause problems or dangers. Always check the diagram before starting any work.
Clear wiring plans save time and money. Stay organized and careful for the best results. A good diagram guides you through the process smoothly. It helps avoid confusion and errors. Trust the diagram, and your home wiring will work well.

