

Are you ready to tackle an essential task that could transform the safety and efficiency of your home? Electrical plug wiring might sound complex, but it’s a skill worth mastering.
Imagine the confidence you'll feel when you can handle simple electrical tasks on your own, without relying on a professional for every small fix. Understanding how to wire a plug not only saves you money, but also empowers you to maintain a safer home environment.
You'll discover straightforward steps, practical tips, and common pitfalls to avoid, making the process of wiring a plug as easy as switching on a light. So, let's get started and unlock your DIY potential!
Types Of Electrical Plugs
Understanding the types of electrical plugs is essential for anyone dealing with wiring or traveling internationally. Different plugs serve various devices and regions, each designed to meet safety and compatibility standards. Knowing the right type can save you from electrical mishaps and equipment damage.
Common Plug Designs
There are several plug designs you will often encounter. The two-prong plug is basic and used for many small appliances that don’t require grounding.
The three-prong plug adds a grounding pin, improving safety by preventing electric shocks. This design is common in household and office equipment.
Some plugs have flat blades, while others feature round pins. This difference affects how securely they fit into sockets and their current-carrying capacity.
- Type A:Two flat parallel pins, common in North America and Japan.
- Type B:Two flat parallel pins with a grounding pin, standard in the US and Canada.
- Type C:Two round pins, used widely in Europe and Asia.
Choosing the right design depends on the device’s power requirements and the socket type available. Have you ever struggled to find a plug adapter that fits your device correctly? That’s why understanding these designs matters.
Plug Standards By Region
Electrical plug standards vary significantly across regions, reflecting different voltage and safety regulations. For example, Europe typically uses 220-240V with Type C or F plugs, while North America uses 110-120V with Type A or B.
In the UK, Type G plugs with three rectangular pins are standard. These plugs include built-in fuses for added protection, a feature not common in many other designs.
| Region | Common Plug Type(s) | Voltage | Frequency |
|---|---|---|---|
| North America | Type A, Type B | 110-120V | 60Hz |
| Europe | Type C, Type F | 220-240V | 50Hz |
| United Kingdom | Type G | 220-240V | 50Hz |
| Australia | Type I | 220-240V | 50Hz |
Understanding these standards helps prevent damage to your devices and ensures your safety. Have you checked the plug type before plugging in a device in a new country? It’s a small step that can save you a lot of trouble.
Tools Needed For Wiring
Wiring an electrical plug requires the right tools to ensure safety and proper connections. Having the correct tools makes the job easier and prevents mistakes. Below are the main tools needed for wiring a plug.
Essential Hand Tools
- Wire Strippers: Remove insulation from wires cleanly and quickly.
- Screwdrivers: Both flat-head and Phillips types for securing screws.
- Needle-Nose Pliers: Hold and bend wires in tight spaces.
- Wire Cutters: Cut wires to the correct length with ease.
- Voltage Tester: Check if wires are live before starting work.
Safety Equipment
- Insulated Gloves: Protect hands from electrical shocks.
- Safety Glasses: Shield eyes from wire fragments and sparks.
- Non-Conductive Mat: Stand on it to avoid grounding yourself.
- Proper Lighting: See clearly to avoid wiring mistakes.
Identifying Wire Colors
Identifying wire colors is crucial for safe electrical plug wiring. Each wire has a specific role and color that helps recognize it quickly. Understanding these colors prevents accidents and ensures proper connections.
Live, Neutral, And Earth Wires
Electrical plugs use three main wires: live, neutral, and earth. The live wire carries current from the power source to the appliance. The neutral wire returns the current back to the power source. The earth wire protects users by directing fault current safely to the ground.
Correctly identifying these wires is essential. Mixing them can cause electric shocks or damage devices. Wire colors make this task easier and safer.
Color Codes By Country
Wire colors vary by country, but most follow international standards. Knowing local codes helps identify wires correctly. Here is a simple table showing common colors:
| Wire Type | USA/Canada | UK/Europe | Australia/New Zealand |
|---|---|---|---|
| Live | Black or Red | Brown | Brown |
| Neutral | White | Blue | Blue |
| Earth | Green or Green/Yellow | Green/Yellow | Green/Yellow |
Always double-check wire colors before starting any electrical work. This step helps avoid mistakes and keeps you safe.

Credit: www.youtube.com
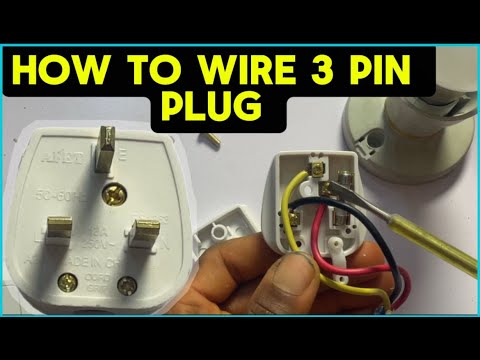
Step-by-step Wiring Process
Wiring an electrical plug requires careful attention to detail and safety. Each step must be done correctly to ensure the plug works well and safely. This guide breaks down the wiring process into simple parts. Follow these instructions to wire a plug properly and avoid common mistakes.
Preparing The Cable
Start by cutting the cable to the desired length. Use a wire stripper to remove about 2 inches of the outer insulation. Be careful not to damage the inner wires.
Separate the three inner wires: live (brown or red), neutral (blue or black), and earth (green/yellow). Strip about half an inch of insulation from each wire end. Make sure the wire strands are neat and not frayed.
Connecting Wires To Terminals
Open the plug housing to access the terminals. Identify the correct terminals for each wire:
- Live (L):Connect the brown or red wire here.
- Neutral (N):Connect the blue or black wire here.
- Earth (E):Connect the green/yellow wire here.
Loosen the screws on each terminal. Insert the stripped wire ends fully under the screws. Tighten the screws firmly to secure the wires. Double-check that no wire strands are loose or sticking out.
Securing The Plug Housing
Place the cable clamp over the outer insulation of the cable. Tighten its screw to hold the cable firmly in place. This prevents the wires from pulling out of the terminals.
Align the plug housing parts together carefully. Screw the plug cover closed, ensuring no wires are pinched. The plug should feel solid and safe to handle.
Safety Tips For Wiring
Working with electrical plug wiring demands careful attention to safety. Mistakes can cause shocks or fires. Following simple safety tips helps protect you and your home. Understanding key safety steps makes wiring easier and safer.
Avoiding Common Mistakes
Many wiring issues come from basic errors. Avoid mixing up live, neutral, and earth wires. Check the plug’s wiring diagram before starting. Use the right tools for stripping and connecting wires. Never force wires into terminals. Loose or tight connections cause problems. Always cut power before you begin wiring. Double-check wire colors and positions before final assembly.
Testing The Connection
Testing ensures the wiring works correctly and safely. Use a voltage tester to check for live wires. Test continuity with a multimeter to confirm connections. Plug the wired plug into a socket carefully. Observe if the device powers on without sparks or heat. If unsure, get a qualified electrician to inspect your work. Testing prevents accidents and ensures reliable power flow.
Troubleshooting Wiring Issues
Troubleshooting wiring issues in electrical plugs is essential for safety and proper function. Faulty wiring can cause devices to stop working or create hazards. Understanding common problems helps fix them quickly and avoid damage.
Careful inspection and simple tests often reveal wiring faults. Many issues come from loose or damaged wires that interrupt the electrical flow. Identifying these problems early prevents bigger troubles later.
Identifying Faulty Connections
Start by checking the plug for signs of damage. Look for burnt marks, discoloration, or melted parts. These indicate poor connections or overheating.
Use a screwdriver to open the plug casing. Inspect each wire carefully. Look for broken strands or wires that are not tightly fastened to terminals.
- Check if the wires are connected to the correct terminals: live, neutral, and earth.
- Ensure no wires are frayed or touching each other inside the plug.
- Test the plug with a socket tester to find wiring errors easily.
Fixing Loose Or Damaged Wires
Turn off the power before handling any wires. Loose wires cause sparks and poor contact. Tighten any screws holding the wires firmly in place.
If wires are damaged, cut off the bad section. Strip the insulation gently to expose fresh wire. Insert the wire fully into the terminal and secure it tightly.
- Replace wires that are severely frayed or broken.
- Use wire strippers for clean removal of insulation.
- Avoid over-tightening screws to prevent wire damage.
After fixing, close the plug casing properly. Test the plug again to ensure it works safely and correctly.
Maintenance And Inspection
Regular maintenance and inspection of electrical plug wiring ensure safety and efficiency. Ignoring these checks can lead to hazards like electric shocks or fires. Simple inspections help spot problems early. This saves money and prevents accidents.
Regular Checks
Inspect the plug wiring often. Look for cracks, frayed wires, or loose connections. Check if the plug fits tightly into the socket. A loose plug can cause sparks or short circuits.
- Examine the outer casing for damage
- Check the wires for any wear or exposure
- Ensure the pins are straight and clean
- Test the plug by gently moving the cable near the plug
Listen for unusual sounds or smells during use. These signs may indicate wiring issues. Regular checks reduce the risk of electrical faults.
When To Replace A Plug
Replace a plug immediately if you see any damage. Worn or broken plugs can cause electric shocks. Do not use plugs with loose pins or exposed wires.
Other signs that need replacement:
- Burn marks or discoloration on the plug
- The plug feels hot while in use
- The cable is frayed or cut near the plug
- The plug no longer fits securely into the socket
Using a damaged plug puts your safety at risk. Swap it out for a new, high-quality plug to protect your home and devices.

Credit: www.familyhandyman.com

Credit: www.familyhandyman.com
Frequently Asked Questions
What Are The Basic Steps For Electrical Plug Wiring?
To wire a plug, first turn off the power supply. Strip the cable ends and connect each wire to the correct terminal: live (brown) to live terminal, neutral (blue) to neutral terminal, and earth (green/yellow) to earth terminal. Secure the wires and close the plug casing.
How To Identify Live, Neutral, And Earth Wires?
Live wires are usually brown or red, neutral wires are blue or black, and earth wires are green/yellow. Always verify with a voltage tester before wiring to ensure safety and correct connections.
Why Is Proper Plug Wiring Important?
Proper wiring prevents electrical shocks, short circuits, and fires. It ensures devices operate safely and efficiently. Incorrect wiring can damage appliances and pose serious safety risks.
Can I Use Any Plug For All Appliances?
No, plugs must match the appliance’s voltage and current rating. Using the wrong plug can cause overheating or malfunction. Always check the appliance specifications before wiring a plug.
Conclusion
Wiring an electrical plug is simple with the right steps. Always connect wires to the correct terminals. Double-check your work to avoid any mistakes. Safety comes first when handling electricity. Understanding basic wiring helps you fix small issues at home.
Practice makes the process easier and faster. Stay careful and patient throughout the task. This knowledge saves money and ensures your devices work well. Keep learning to feel confident with electrical projects. Small skills lead to big results over time.

