


Are you ready to give your cabinets a sleek, modern look? Installing concealed hinges can transform your furniture, making it not only stylish but also smooth and silent to use.
But if you’ve never tried it before, the idea might seem tricky or confusing. Don’t worry—this guide will walk you through every step, so you can feel confident and get professional results. Keep reading to discover how easy it is to upgrade your space with concealed hinges and why this small change makes a big difference.
Tools And Materials Needed
Installing concealed hinges requires the right tools and materials for a clean finish. Proper preparation helps you avoid mistakes.
This guide covers the essential tools and how to choose the right hinges for your project.
Essential Tools
You need specific tools to install concealed hinges accurately. These tools help you drill, measure, and fit hinges properly.
- Drill with a Forstner bit (usually 35mm)
- Screwdriver or drill driver
- Measuring tape or ruler
- Marking pencil
- Chisel for fine adjustments
- Clamps to hold doors steady
- Spirit level to check alignment
Choosing The Right Hinges
Different hinges suit different doors and cabinets. Choose hinges based on door thickness and overlay type.
| Hinge Type | Door Thickness | Overlay Style |
| Full Overlay | 16-19mm | Door covers cabinet frame completely |
| Half Overlay | 16-19mm | Two doors share one cabinet frame side |
| Inset | 16-19mm | Door sits inside cabinet frame |
Preparing The Door And Frame
Installing concealed hinges needs careful preparation of the door and frame. This ensures the hinges fit well and the door works smoothly.
Start by checking the door and frame for damage. Fix any cracks or warps before you begin hinge installation.
Measuring For Hinge Placement
Measure the door to find the best spots for the hinges. Usually, hinges go near the top and bottom of the door.
Use a tape measure to mark the distance from the edges. Keep the measurements even to balance the door weight.
- Place one hinge about 5 inches from the top edge
- Place the second hinge about 10 inches from the bottom edge
- Space additional hinges evenly between top and bottom
Marking Hinge Locations
Mark the exact spots on the door and frame where you will install the hinges. Use a pencil for clear, removable marks.
Check your marks twice to avoid mistakes. Proper marking helps cut the hinge mortises accurately.
- Align the hinge on the door edge
- Trace around the hinge plate lightly
- Repeat on the door frame
- Double-check all marks before cutting
Cutting Hinge Mortises
Cutting hinge mortises is a key step in installing concealed hinges. This process creates a recessed area for the hinge to fit flush with the door or frame.
Properly cutting mortises ensures smooth door movement and a clean look. You can use different tools depending on your skill and equipment.
Using A Router Or Chisel
A router makes cutting mortises faster and more precise. Set the depth and use a guide to keep edges straight. If you don’t have a router, a sharp chisel works well too.
- Mark the mortise outline on the wood clearly.
- If using a router, clamp a guide to follow the marks.
- Set the router depth to match the hinge thickness.
- Make shallow passes until you reach full depth.
- For chiseling, start by scoring the edges along the outline.
- Remove wood inside the outline carefully with the chisel.
- Keep the bottom flat and smooth for the hinge to sit well.
Ensuring Accurate Depth And Size
The mortise must match the hinge size and depth exactly. Too shallow or small causes poor fit. Too deep or wide weakens the wood and looks bad.
| Measure | Tool Needed | Recommended Action |
| Depth | Caliper or ruler | Set router or chisel to hinge thickness |
| Length | Tape measure | Mark hinge length on wood surface |
| Width | Square or ruler | Draw clear outline for mortise edges |
| Fit | Test hinge | Check hinge sits flush without gaps |
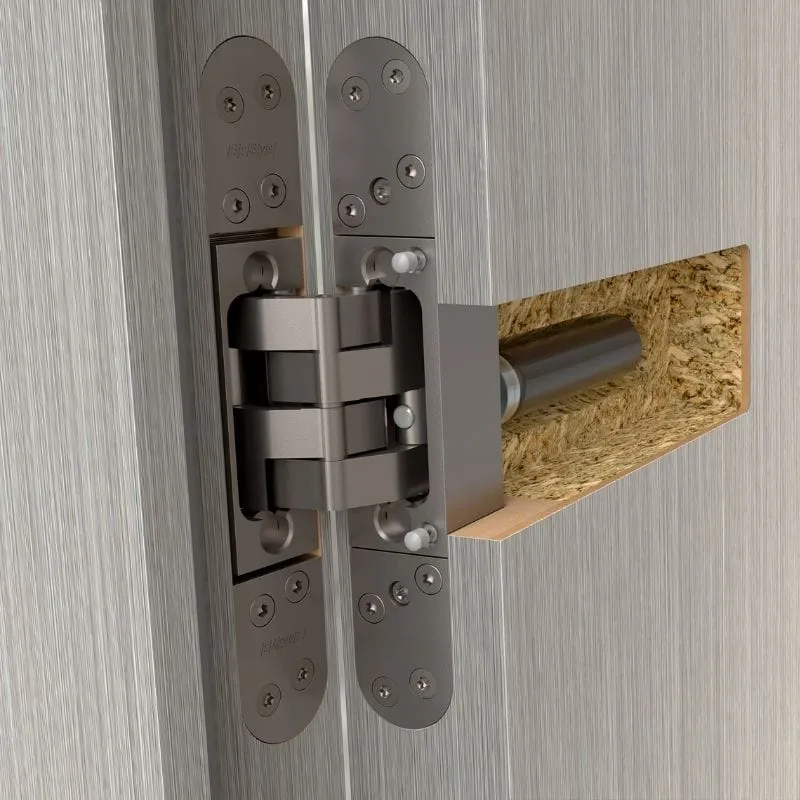
Attaching The Hinges
Attaching concealed hinges correctly helps the door work smoothly. Proper installation keeps the door aligned and secure.
This guide covers the key steps for attaching hinges to the door and frame. Follow each carefully to ensure a good fit.
Securing Hinges To Door
Start by marking the hinge positions on the door edge. Use a template or measure carefully for accuracy.
- Drill pilot holes to avoid splitting the wood.
- Align the hinge cup with the hole on the door.
- Insert screws and tighten them firmly but not too tight.
- Check that the hinge sits flush with the door surface.
Fixing Hinges To Frame
Attach the hinge plate to the door frame using the correct screw holes. Make sure the frame is clean and dry.
| Step | Action | Tip |
|---|---|---|
| 1 | Position the hinge plate on the frame. | Use a level to keep it straight. |
| 2 | Mark screw hole locations. | Double-check before drilling. |
| 3 | Drill pilot holes for screws. | Choose drill bit size matching screws. |
| 4 | Secure the plate with screws. | Do not overtighten to avoid damage. |
Aligning And Adjusting The Door
Proper alignment is key to a smooth and lasting door fit. Adjusting concealed hinges ensures the door closes perfectly without gaps.
Follow simple checks and make fine adjustments to improve door fit and function.
Checking Door Fit
First, close the door slowly and watch the gaps around it. The door should sit evenly in the frame. Look for uneven spaces or rubbing points.
- Check the top and bottom gaps for equal spacing.
- Make sure the door does not hit the frame when closing.
- Look for any wobble or looseness when the door is closed.
- Test the door’s swing to ensure it opens smoothly.
Making Fine Adjustments
Use the hinge screws to adjust the door position. Small turns can shift the door left, right, up, or down. Adjust slowly and recheck the fit after each change.
| Adjustment Direction | Action on Screws | Effect on Door |
| Left or Right | Turn side adjustment screws | Moves door horizontally |
| Up or Down | Turn height adjustment screws | Raises or lowers door |
| In or Out | Turn depth adjustment screws | Moves door closer or away from frame |
Credit: hdcmfg.com
Common Installation Mistakes
Installing concealed hinges can be tricky if not done correctly. Mistakes may lead to misalignment or door sagging.
Learn how to avoid these common mistakes to ensure smooth operation and alignment.
Avoiding Misalignment
Misalignment is a frequent issue when installing concealed hinges. It can cause the door to bind or not close properly.
- Ensure the hinge cups are drilled at the correct depth.
- Use a template to mark precise positions for hinges.
- Check that the hinges are level before securing them.
Preventing Door Sagging
Door sagging occurs when hinges are not properly secured or aligned. This can affect the door's function and appearance.
| Potential Problem | Solution |
| Loose screws | Tighten screws firmly |
| Weak support | Use longer screws |
| Incorrect hinge size | Choose the right hinge for door weight |
Maintenance Tips For Hinges
Concealed hinges are essential for smooth door operations. Regular maintenance keeps them working well.
Follow these simple tips to ensure your hinges remain in top condition. Proper care prolongs their lifespan and ensures optimal performance.
Lubrication
Lubrication keeps hinges moving smoothly. Apply a few drops of oil every few months.
Avoid using thick grease. It can attract dust and cause hinges to stick.
- Use silicone spray for best results
- Wipe off excess oil to prevent buildup
- Check for rust before applying lubricant
Regular Inspection
Inspect your hinges every few months. Look for signs of wear or damage.
Tighten any loose screws. Loose hinges can cause doors to misalign.
- Check for unusual noises when opening doors
- Ensure hinges are properly aligned
- Replace any damaged parts promptly

Credit: www.amazon.ca

Credit: www.amazon.ca
Frequently Asked Questions
What Tools Are Needed For Concealed Hinge Installation?
You need a drill, screwdriver, measuring tape, pencil, and a concealed hinge jig for precise drilling. These tools ensure proper alignment and secure fitting.
How Do You Align Concealed Hinges Correctly?
Measure and mark hinge positions on both door and frame. Use a jig or template for accuracy. Align hinges before securing with screws.
Can Concealed Hinges Support Heavy Cabinet Doors?
Yes, high-quality concealed hinges can support heavy doors. Choose hinges rated for your door weight to ensure durability and smooth operation.
How Do You Adjust Concealed Hinges After Installation?
Most concealed hinges have adjustment screws for height, depth, and side-to-side movement. Use a screwdriver to fine-tune door alignment easily.
Conclusion
Installing concealed hinges can improve your furniture’s look and function. These hinges hide inside the door, giving a clean and neat appearance. They also help doors open smoothly and quietly. With the right tools and careful steps, anyone can fit them well.
Take your time and follow instructions closely. The effort makes your cabinets or doors more stylish and practical. Try concealed hinge installation to enjoy a tidier and modern space. It’s a simple upgrade that brings lasting benefits.

