

Are you planning to hitch a trailer to your vehicle but feel daunted by the electrical connections? You're not alone.
Wiring a trailer connector might seem like a complex puzzle, but with the right diagram, you can simplify the process and ensure a seamless connection. Imagine the confidence you'll feel on your road trip, knowing your trailer's lights and signals are perfectly synced with your vehicle.
We'll uncover the secrets of a trailer electrical connector wiring diagram, giving you the tools to tackle this task with ease. Stay with us to discover how a simple diagram can transform your towing experience, making it safer and more efficient.
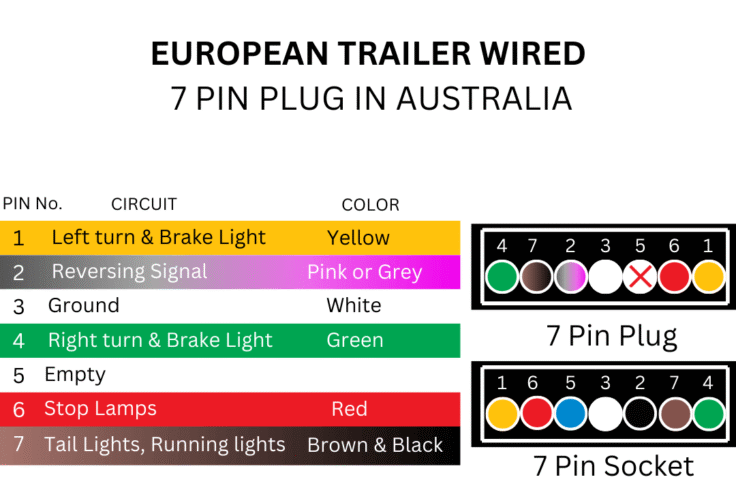
Credit: www.a2btrailers.com.au
Types Of Trailer Connectors
Trailer electrical connectors come in various types. Each type serves specific wiring needs. Knowing each type helps in choosing the right connector for your trailer. Here is a breakdown of common trailer connectors used in wiring.
7-pin Connector
The 7-pin connector is the most common for trailers. It supports brake lights, turn signals, and electric brakes. It also powers reverse lights and auxiliary circuits. This connector is ideal for larger trailers and heavy-duty towing.
6-pin Connector
Used often on trailers without electric brakes. It handles basic lighting functions like brake and turn signals. The 6-pin can also provide power for auxiliary devices. It is a good choice for small to medium trailers.
4-pin Connector
The 4-pin connector is simple and widely used. It controls brake lights, turn signals, and tail lights only. It does not support electric brakes or extra power circuits. Perfect for light trailers and basic towing needs.
5-pin Connector
This connector adds a separate wire for electric brakes or auxiliary power. It handles standard lighting plus one extra function. The 5-pin connector suits trailers with moderate electrical needs. It offers more flexibility than 4-pin types.
Essential Wiring Components
Understanding the essential wiring components is key to creating a reliable trailer electrical system. Each part plays a crucial role in ensuring your trailer’s lights, brakes, and other electrical features work flawlessly. Knowing these components helps you troubleshoot issues quickly and maintain safety on the road.
Wires And Gauges
Wires carry the electrical current between your towing vehicle and trailer. Choosing the right wire gauge is vital; too thin, and the wire may overheat or cause voltage drops. Typically, 12 or 14 gauge wires are common for trailer wiring, but heavier loads require thicker gauges.
Think about your trailer’s needs: Are you powering just lights, or are there brakes and auxiliary systems? Matching wire size to the load prevents failures and keeps your setup efficient.
Connectors And Plugs
Connectors and plugs link the trailer wiring to your vehicle’s electrical system. They come in various types—like 4-pin, 6-pin, or 7-pin—each designed for different functions and levels of complexity.
Using the right connector type ensures all signals transfer correctly. Imagine losing brake lights just because of a faulty plug—it’s more common than you think. Always check compatibility and secure connections to avoid unexpected breakdowns.
Fuses And Relays
Fuses protect your wiring from electrical overloads by breaking the circuit if current spikes. Relays act like switches, controlling high-current circuits with low-current signals, which prevents your vehicle’s switches from wearing out quickly.
Including fuses and relays in your trailer wiring setup adds a layer of safety and durability. Have you ever dealt with a blown fuse on the road? Keeping spares and knowing their placement can save you time and frustration.
Color Codes And Wire Functions
Understanding the color codes and wire functions in a trailer electrical connector wiring diagram is essential for safe and effective wiring. Each wire color is tied to a specific function, making it easier to troubleshoot issues and ensure proper connections. Knowing these details can save you time and frustration during installation or repair.
Common Wire Colors
Trailer wiring usually follows a standard color scheme to keep things consistent across different vehicles and trailers. Here are the most common wire colors you’ll encounter:
- White:Ground wire; essential for completing the electrical circuit.
- Brown:Tail lights and running lights; keeps your trailer visible on the road.
- Yellow:Left turn signal and brake light; crucial for signaling your moves.
- Green:Right turn signal and brake light; works in tandem with the yellow wire.
- Blue:Electric brakes; controls the trailer’s braking system.
- Red:Auxiliary power or reverse lights; supplies power for accessories or backup lights.
Function Assignments
Each wire color corresponds to a specific function that keeps your trailer’s electrical system running smoothly. Knowing what each wire does helps prevent mistakes that could damage components or create safety hazards.
| Wire Color | Function | Why It Matters |
|---|---|---|
| White | Ground | Completes the electrical circuit; without it, lights and brakes won’t work properly. |
| Brown | Tail & Running Lights | Keeps you visible to other drivers, especially at night. |
| Yellow | Left Turn & Brake Signal | Communicates your intentions to turn or stop on the left side. |
| Green | Right Turn & Brake Signal | Same as yellow but for the right side; critical for safe turns and stops. |
| Blue | Electric Brakes | Engages the trailer brakes; important for controlling heavy loads. |
| Red | Auxiliary Power / Reverse Lights | Provides power for extras like interior trailer lights or reverse lamps. |
Have you ever traced wiring without knowing these color codes? It’s easy to get confused or cause damage. Taking a moment to familiarize yourself with these colors can make all the difference in your trailer’s electrical system performance.
Step-by-step Wiring Process
Wiring a trailer electrical connector can seem tricky at first. A clear, step-by-step guide helps make the process simple. Follow each part carefully to ensure safe and correct wiring. This will help your trailer lights and signals work perfectly every time.
Preparing The Trailer Wiring
Begin by gathering all necessary tools and materials. This includes wire strippers, connectors, electrical tape, and the wiring harness. Clean the trailer’s wiring points to remove dirt and rust. Cut wires to the needed length for easy handling. Strip about half an inch of insulation from each wire end. Double-check the wiring diagram to match each wire color correctly.
Connecting The Wires
Match each trailer wire to the corresponding connector wire by color. Use butt connectors or solder to join wires securely. Crimp connectors tightly to avoid loose connections. Avoid mixing wires with different functions. Make sure the ground wire connects well to the trailer frame. Keep wires organized to prevent tangling or damage later.
Securing And Testing Connections
Wrap each connection with electrical tape or heat shrink tubing. Secure wires along the trailer frame with zip ties or clips. Keep wires away from moving parts and heat sources. Test all lights by connecting the trailer to the vehicle. Check brake lights, turn signals, and running lights. Fix any faulty connections before finalizing the wiring setup.
Troubleshooting Wiring Issues
Wiring issues in trailer electrical connectors can be frustrating and sometimes dangerous. Identifying and fixing these problems quickly ensures your trailer’s lights and brakes function properly, keeping you safe on the road. Understanding common issues and how to test and repair them can save you time and money.
Common Problems
One frequent issue is a loose or corroded connection. Moisture can cause corrosion inside the connector, leading to intermittent or complete loss of electrical flow.
Broken or frayed wires often result from wear and tear or accidental damage. You might notice blinking lights or no signal at all on the trailer.
Incorrect wiring can cause lights to behave oddly, such as brake lights flashing when turning. This usually happens if wires were connected to the wrong terminals during installation.
Testing Tools And Techniques
A multimeter is your best friend for diagnosing wiring problems. It measures voltage, continuity, and resistance, helping you pinpoint where the circuit breaks down.
Using a test light can quickly show if power is reaching the connector, especially when checking brake or turn signals.
Check each wire individually by connecting the tester to the corresponding terminal on the trailer and the towing vehicle. This helps isolate faulty wires or bad grounds.
Repair Tips
Always disconnect the trailer and vehicle before starting repairs to avoid shorts or shocks.
Clean corroded connectors with electrical contact cleaner and a small wire brush. This can restore a poor connection without replacing parts.
If wires are damaged, cut out the bad section and use waterproof connectors or solder with heat shrink tubing to ensure durability.
Double-check your wiring diagram before reconnecting to avoid mixing up wires. A quick mistake here can create new problems.
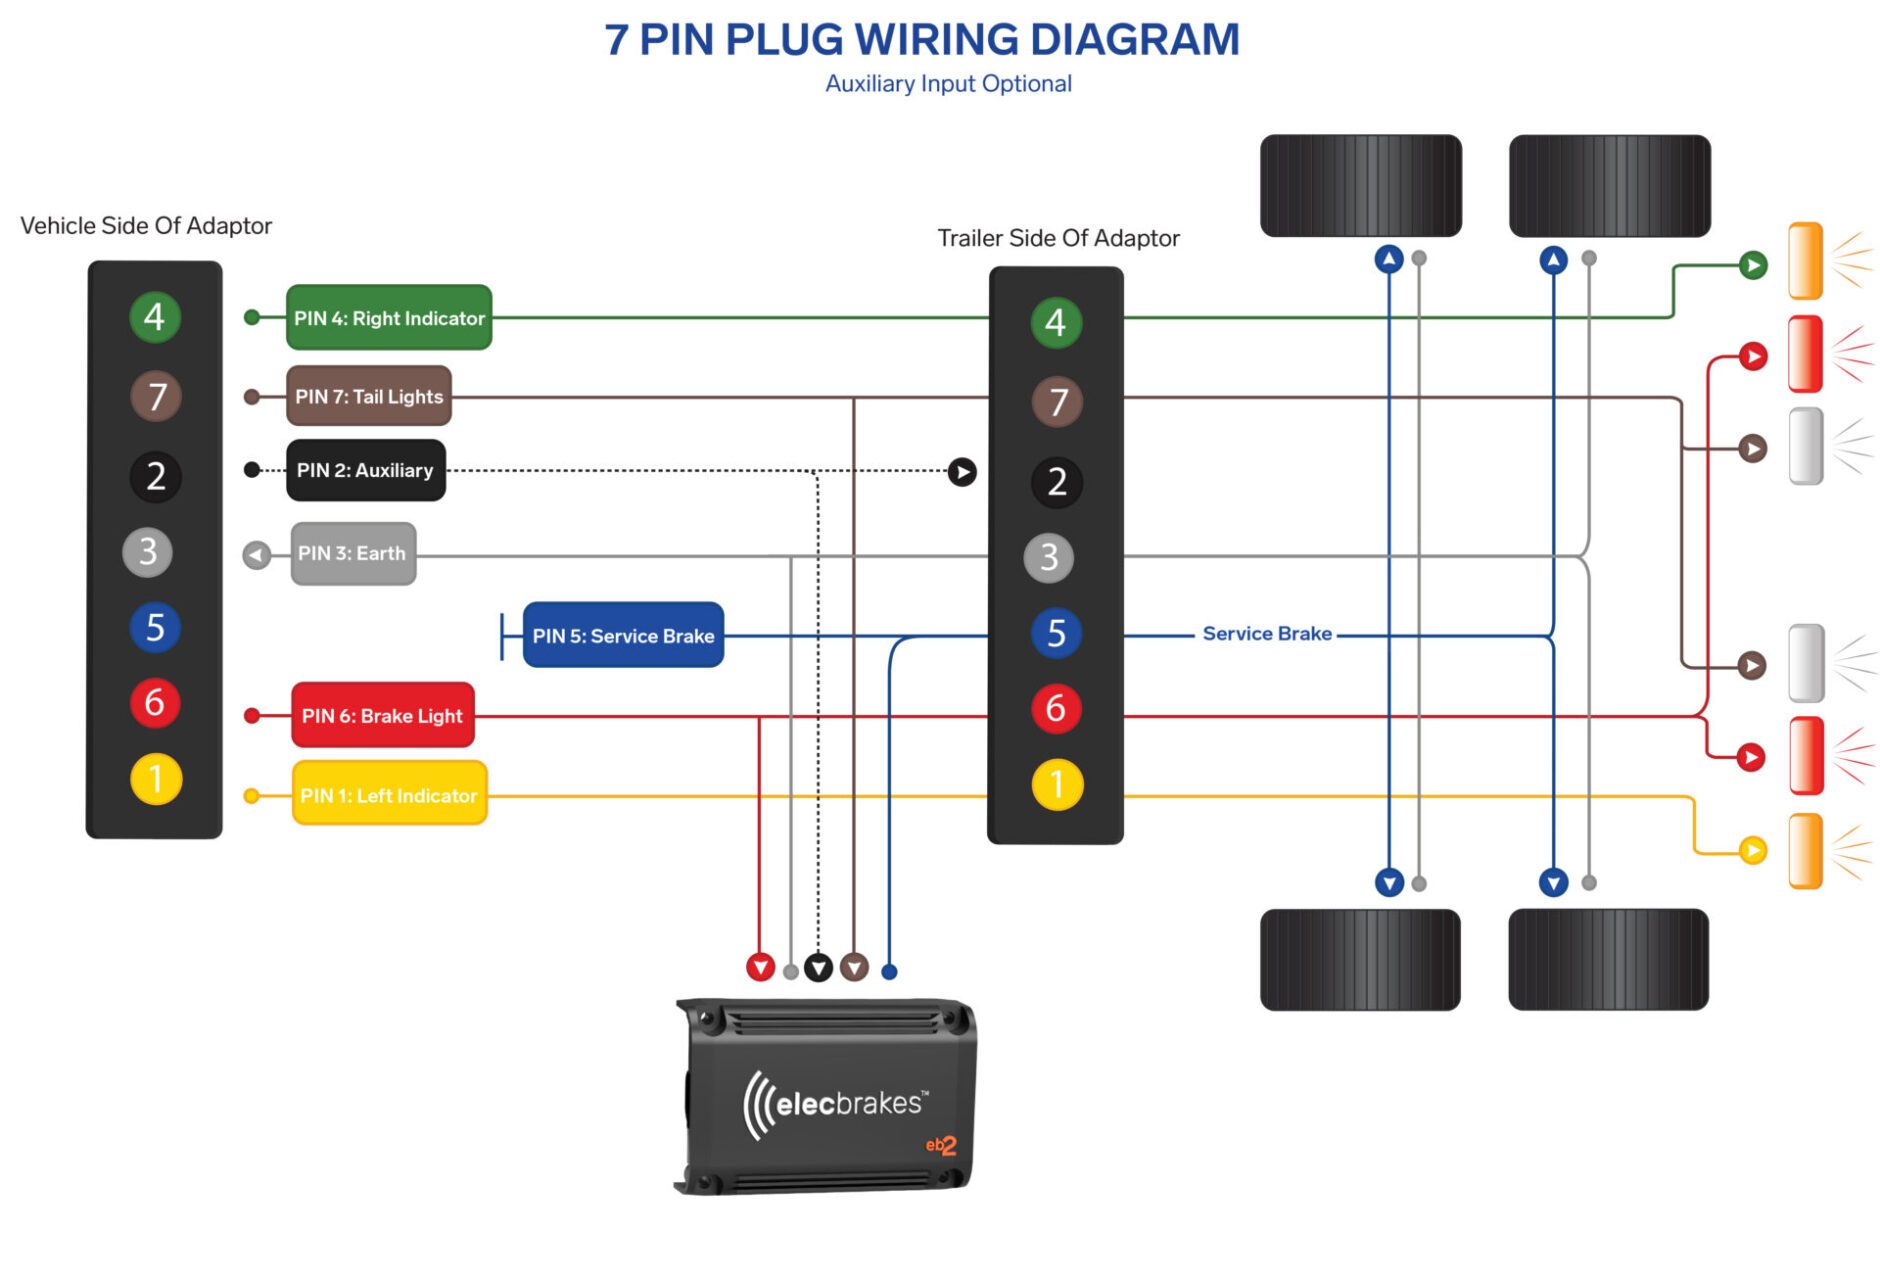
Credit: www.elecbrakes.com
Safety Tips For Wiring Setup
Setting up trailer electrical connectors demands attention to safety. Poor wiring can cause short circuits, fires, or equipment failure. Follow these safety tips to ensure a reliable and secure wiring setup.
Proper Insulation
Insulate all wires carefully to prevent contact and short circuits. Use quality electrical tape or heat shrink tubing on exposed connections. Proper insulation keeps moisture and dirt out, reducing corrosion risks. Always check that insulation covers the entire wire length.
Avoiding Overloads
Match wire gauge to the power load requirements. Using thin wires for high current causes overheating and damage. Use fuses or circuit breakers to protect circuits from excess current. Avoid connecting too many devices to a single circuit to prevent overload.
Regular Maintenance
Inspect wiring and connectors often for wear or damage. Clean connectors to remove dirt and corrosion for better contact. Replace any frayed wires or loose connections immediately. Regular checks keep the system safe and working well.
Upgrading Trailer Wiring
Upgrading your trailer wiring enhances safety and functionality on the road. Old wiring may fail or lack features needed for modern trailers. Improving wiring ensures better connection, signal clarity, and durability. It also allows adding new functions to meet specific needs.
Adding Additional Functions
Basic trailer wiring handles lights and brakes. Upgrading lets you add features like:
- Reverse lights for better visibility
- Electric brakes with adjustable controls
- Auxiliary power for charging devices
- Backup cameras for safer reversing
These extras improve safety and convenience during towing.
Using Wireless Systems
Wireless trailer wiring reduces cable clutter and wear. It uses radio signals to connect trailer lights and brakes. Benefits include:
- Easy installation without running long wires
- Less chance of wire damage or corrosion
- Flexible use with multiple trailers
Wireless systems work well for occasional or light towing needs.
Choosing Durable Materials
Quality materials extend wiring life and reliability. Look for:
- Weather-resistant cables with UV protection
- Corrosion-proof connectors and terminals
- Thick insulation to prevent shorts and damage
- Flexible wires that resist cracking in cold
Durable materials reduce maintenance and improve safety.

Credit: thelocalguystestandtag.com.au
Frequently Asked Questions
What Is A Trailer Electrical Connector Wiring Diagram?
A trailer electrical connector wiring diagram shows the wiring layout for trailer lights and brakes. It helps ensure correct connections between the tow vehicle and trailer. This diagram simplifies installation and troubleshooting of trailer electrical systems.
How Do I Identify Trailer Wiring Colors?
Trailer wiring colors follow standard codes: white is ground, green is right turn, yellow is left turn, brown is tail lights, and blue is brakes. Knowing these colors helps you connect wires accurately and avoid electrical issues.
Why Is Trailer Wiring Important For Safety?
Proper trailer wiring ensures all lights and brakes function correctly. This improves visibility and communication with other drivers. Safe wiring reduces accident risks and legal penalties while towing.
Can I Use A Universal Trailer Wiring Diagram?
Yes, universal trailer wiring diagrams cover most common connectors and wiring standards. They provide a reliable guide for basic trailer electrical setups. However, always verify with your specific vehicle and trailer manuals.
Conclusion
Understanding the trailer electrical connector wiring diagram makes installation easier. It helps avoid mistakes and keeps your trailer lights working safely. Following the diagram saves time and prevents electrical problems. Always double-check connections before use. Clear wiring means safer trips on the road.
Keep this guide handy for quick reference. Proper wiring ensures your trailer stays visible and protected. Simple steps can make a big difference. Stay safe and enjoy smooth towing every time.

