

Wall plug wiring can seem intimidating, but getting it right is crucial for your safety and the smooth functioning of your devices.
You’ll discover simple, clear steps to wire a wall plug correctly—even if you have little to no experience. By the end, you’ll feel confident handling your own wiring tasks and avoiding common mistakes that could cause damage or hazards.
Keep reading to learn the easy way to protect your home and power up your devices the right way.

Credit: www.familyhandyman.com
Types Of Wall Plugs
Wall plugs help fix screws into different wall materials. They provide support and prevent screws from loosening. Choosing the right wall plug is important for strong and safe fittings.
There are several types of wall plugs. Each type works best with certain materials and loads. Here, we explain four common types of wall plugs.
Plastic Anchors
Plastic anchors are the most common type. They are easy to use and work well with drywall, plaster, and brick. The anchor expands when you insert the screw, holding it tight in the wall.
Metal Anchors
Metal anchors are stronger than plastic ones. They are best for heavy items and solid walls like concrete or stone. Metal anchors resist bending and provide a firm grip.
Toggle Bolts
Toggle bolts have wings that open inside a hollow wall. They spread the load over a large area. This makes them perfect for hanging heavy objects on drywall or hollow walls.
- Insert the folded toggle bolt through the hole
- Wings open inside the wall cavity
- Tighten the screw to secure the bolt
- Supports heavy loads on hollow walls
Molly Bolts
| Feature | Description |
| Material | Metal with expandable sleeves |
| Use | Hollow walls and drywall |
| Installation | Insert then tighten to expand sleeves |
| Load Capacity | Medium to heavy loads |
Molly bolts expand behind the wall as you tighten them. This creates a strong hold for medium to heavy items. They are reusable and good for permanent fixtures.

Credit: www.youtube.com
Tools Needed For Wiring
Wiring a wall plug requires specific tools for a safe and efficient job. Having the right tools ensures the wiring process is smooth and effective.
This guide covers essential tools like screwdrivers, drills, wire strippers, and voltage testers. Each tool plays a unique role in the wiring process.
Screwdrivers And Drills
Screwdrivers and drills are vital for installing wall plugs. They help secure the wires and the plug casing.
- Flathead screwdriver for loosening screws
- Phillips screwdriver for crosshead screws
- Electric drill for drilling holes
Wire Strippers
Wire strippers remove insulation from wires. This tool is necessary for making connections in the plug.
Ensure the wire stripper is adjusted to the wire's thickness. This prevents damage to the metal wire.
Voltage Testers
Voltage testers check if the wires are live. They ensure safety before handling electrical components.
| Tester Type | Function |
| Non-contact tester | Detects voltage without touching the wire |
| Digital multimeter | Measures voltage, current, and resistance |
Preparing The Wall Plug
Preparing the wall plug correctly is important for a strong hold. It helps secure screws and fixtures safely.
Follow simple steps before inserting the wall plug. This ensures proper fitting and lasting support.
Choosing The Right Size
Pick a wall plug size that matches the screw diameter. Too small plugs may break easily.
Check the length of the plug. It should fit the hole depth and hold weight well.
- Use thicker plugs for heavy objects
- Choose smaller plugs for light fixtures
- Match plug length with hole depth
Marking Drill Points
Mark drill points clearly on the wall. Use a pencil or marker for accuracy.
Measure spacing carefully. Even marks help keep fixtures balanced and neat.
- Use a level to keep marks straight
- Double-check measurements before drilling
- Mark all points before starting to drill
Drilling Correctly
Use the correct drill bit size for the wall plug. This helps the plug fit tightly.
Drill slowly and steadily. Avoid pushing too hard to prevent wall damage.
- Start with a small pilot hole if needed
- Keep the drill straight to the wall
- Clean dust from the hole before inserting plug

Credit: www.familyhandyman.com
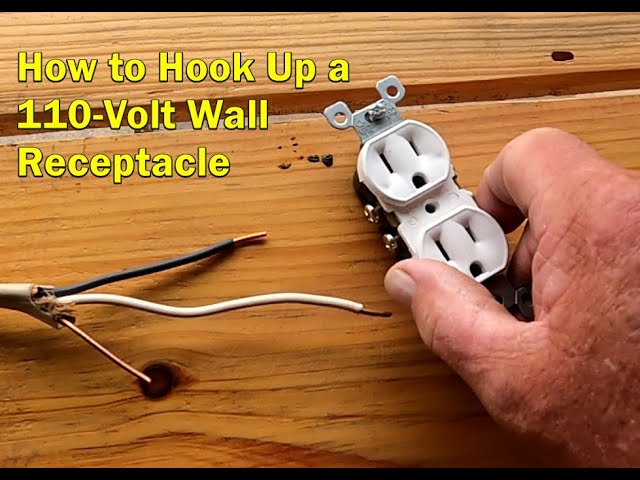
Wiring Steps
Wiring a wall plug is a simple task if you follow the right steps. Proper wiring ensures safety and correct function.
This guide breaks down the process into clear parts. You will learn how to prepare the wires, connect them, and secure the plug.
Stripping The Wires
Start by removing the outer insulation from each wire. Use a wire stripper to avoid damaging the metal inside.
- Cut about 2 cm of insulation from each wire tip.
- Check that the copper strands are clean and not broken.
- Twist the strands gently to keep them together.
Connecting Wires To The Plug
Identify each wire by its color before connecting. Usually, brown is live, blue is neutral, and green/yellow is ground.
| Wire Color | Function | Plug Terminal |
| Brown | Live | L |
| Blue | Neutral | N |
| Green/Yellow | Earth | E or Ground |
Loosen the screws on the plug terminals. Insert each wire fully and tighten the screws firmly.
Securing The Connection
Ensure that wires do not move inside the plug. Use the clamp to hold the cable in place.
Follow these tips to secure the connection:
- Check that no copper is outside the terminal.
- Make sure the cable grip holds the outer sheath only.
- Tighten all screws but do not over-tighten to avoid damage.
- Test the plug by gently pulling the wires to confirm they are secure.
Safety Precautions
Wiring a wall plug can be dangerous if you do not follow safety rules. Taking safety precautions helps prevent shocks and accidents.
Always prepare well before starting any electrical work. This guide shows important safety steps for wiring a wall plug.
Turning Off Power
Before you start wiring, turn off the power at the main switch. This stops electricity from flowing and keeps you safe.
Make sure the power is off for the area where you will work. Double-check to avoid any accidents.
Checking For Live Wires
Use a voltage tester to check if wires are live. This tool tells you if electricity is still flowing in the wires.
Testing wires helps you avoid touching live wires by mistake. Always test before you touch any wire.
- Hold the tester's probe near the wire
- Look for a light or sound signal
- Do not touch wires if tester shows power
Using Insulated Tools
Use tools with insulated handles to protect yourself from electric shocks. Insulation blocks electricity from reaching your hands.
Do not use damaged or worn tools. Check your tools before starting work to ensure safety.
- Choose screwdrivers and pliers with rubber grips
- Keep tools clean and dry
- Replace tools if insulation is cracked or missing
Common Mistakes To Avoid
Wiring a wall plug can be simple if done right. Many people make mistakes that cause problems.
Knowing what to avoid helps keep your wiring safe and working well.
Overtightening Screws
Too much force on screws can damage the plug or wires. It may break the plastic or strip the threads.
Screws should be tight enough to hold wires firmly but not so tight that they cause damage.
- Use a screwdriver with good grip
- Tighten screws until wires do not move
- Stop tightening if plastic starts to crack
Using Incorrect Wall Plugs
Wall plugs come in many sizes and types. Using the wrong one can cause poor hold or damage.
Choose a wall plug that fits the wall material and the screw size for a secure fit.
- Check the wall type before buying plugs
- Match plug size to screw diameter
- Use plugs designed for your wall material
Ignoring Wire Color Codes
Wire colors tell you which wire is live, neutral, or ground. Ignoring colors can cause serious errors.
Always connect wires by their color codes to avoid shocks and electrical faults.
| Wire Color | Purpose |
|---|---|
| Brown or Red | Live wire |
| Blue or Black | Neutral wire |
| Green/Yellow stripes | Ground wire |
Testing The Installation
After wiring a wall plug, testing ensures it works safely and correctly. This process protects you and your devices from electrical faults.
Follow simple steps to check the wiring and fix any issues found during testing.
Powering On Safely
Turn on the power carefully to avoid shocks or damage. Make sure the area is dry and use insulated tools if needed.
- Switch off the main power before connecting the plug.
- Secure all wire connections tightly in the plug.
- Use gloves or insulated tools when handling wires.
- Turn on the power at the main switch slowly.
- Stand clear of the plug while powering on.
Using A Voltage Tester
A voltage tester checks if electricity flows correctly through the plug. It helps find live wires and confirms the plug is working.
| Tester Indicator | Meaning |
|---|---|
| Light On | Power is present; wiring is live |
| No Light | No power; check connections or power supply |
| Flashing Light | Possible loose wire or fault |
Troubleshooting Issues
If the plug does not work, check common problems before calling an electrician.
- Verify all wires are connected to the right terminals.
- Look for damaged wires or loose screws inside the plug.
- Test the socket with a different device to rule out appliance issues.
- Use the voltage tester again to find where power stops.
- Replace the fuse if it is blown or damaged.
Maintenance Tips
Proper maintenance of wall plug wiring keeps your home safe. It prevents electrical problems and extends the wiring’s life.
Follow simple steps to inspect and care for your wall plug wiring regularly. This helps avoid hazards like shocks or fires.
Regular Inspection
Check wall plugs for signs of wear or damage at least once every few months. Look for cracks, burns, or discoloration on the outlets and plugs.
- Test if plugs fit tightly in the socket
- Look for sparks or unusual smells when plugging in devices
- Listen for buzzing sounds near the outlet
- Examine the wiring for exposed or frayed wires
Replacing Damaged Components
Replace any damaged plugs, outlets, or wires immediately. Faulty parts can cause shorts or electric shocks.
| Component | Signs to Replace |
| Wall Plug | Cracks, burn marks, loose fit |
| Outlet | Sparking, discoloration, wobbling |
| Wiring | Frayed insulation, exposed copper |
Keeping Connections Tight
Loose connections create heat and can damage wiring. Check that all screws and terminals stay tight.
Follow this checklist to keep connections secure:
- Turn off power before checking connections.
- Use a screwdriver to tighten all terminal screws.
- Ensure wires are fully inserted into terminals.
- Do not overtighten to avoid damage.
- Test the plug by gently wiggling it to check for looseness.
Frequently Asked Questions
What Is Wall Plug Wiring Used For?
Wall plug wiring connects electrical outlets to power sources. It safely delivers electricity to appliances and devices. Proper wiring ensures efficient and secure power distribution in homes and buildings.
How Do You Wire A Wall Plug Safely?
Turn off the power before wiring. Connect live, neutral, and earth wires correctly. Use insulated tools and follow local electrical codes for safety.
Can I Install Wall Plug Wiring Myself?
Basic wiring can be done by DIYers with knowledge. However, complex wiring should be handled by licensed electricians to ensure safety and compliance.
What Are Common Wall Plug Wiring Colors?
Typically, live wire is brown or red, neutral is blue or black, and earth is green/yellow. Always verify local wiring standards before installation.
Conclusion
Wiring a wall plug safely is important for every home. Use the right tools and follow steps carefully. Double-check connections to avoid electrical problems. Remember, safety always comes first with electricity. Understanding basics helps you fix or install plugs with confidence.
Take your time and stay focused during the process. This way, you keep your home safe and powered. Simple steps make a big difference in wiring success. Keep learning to handle small electrical tasks easily.

