


Have you ever needed to take a door off its hinges but didn’t know where to start? Whether you’re fixing, painting, or replacing a door, removing it safely and easily is the first step.
You might worry about damaging the door or the frame, or struggle with heavy, stubborn hinges. But don’t worry—you’re about to learn simple, clear steps that make this task quick and stress-free. Keep reading, and you’ll gain the confidence to handle your door like a pro.
Tools Needed
Taking a door off its hinges requires a few basic tools. Having the right tools makes the job easier and faster.
This guide will list the common tools you need to remove a door safely and correctly.
Screwdriver
A screwdriver is essential for removing hinge screws. Most doors use either a flathead or Phillips screwdriver.
Hammer
A hammer helps to gently tap the hinge pins out. Use a small hammer to avoid damage to the door or frame.
Hinge Pin Remover Or Nail
This tool or a simple nail pushes the hinge pins up and out. It fits into the small hole at the bottom of the hinge pin.
Pry Bar Or Putty Knife
Use a pry bar or putty knife to gently loosen the door if it sticks after removing the pins. These tools help avoid damage.
Safety Gear
Wear safety glasses and gloves to protect yourself from dust and sharp edges while working on the door.
- Screwdriver (flathead or Phillips)
- Hammer (small size)
- Hinge pin remover or a sturdy nail
- Pry bar or putty knife
- Safety glasses
- Work gloves
| Tool | Purpose |
|---|---|
| Screwdriver | Remove screws from hinges |
| Hammer | Tap hinge pins out carefully |
| Hinge Pin Remover | Push hinge pins up and out |
| Pry Bar / Putty Knife | Loosen stuck door without damage |
| Safety Gear | Protect eyes and hands during work |

Credit: www.thcoo.com
Safety Precautions
Removing a door from its hinges can be a simple job. It needs care to stay safe. Using the right tools and methods helps prevent injuries.
Follow these safety tips before you start taking the door off the hinges.
Wear Protective Gear
Always wear safety glasses to protect your eyes from dust and debris. Gloves protect your hands from sharp edges and splinters.
- Use safety glasses or goggles
- Wear sturdy gloves
- Consider a dust mask if needed
Use Proper Tools
Use the right tools like a screwdriver or hammer to remove hinge pins safely. Avoid makeshift tools that can slip or break.
- Use a flathead screwdriver for hinge pins
- Use a hammer gently to tap pins out
- Keep tools in good condition
Secure The Door
Hold the door firmly or have someone help you. Doors can be heavy and may fall once hinges are loose.
- Ask for help if the door is heavy
- Use a wedge or block to support the door
- Do not rush removing the door
Clear The Work Area
Remove objects around the door before you start. This prevents tripping and gives you space to work safely.
- Clear rugs or loose items
- Keep pets and children away
- Have good lighting in the area
Check For Electrical Or Other Hazards
Look for wires, cables, or other hazards near the door frame. Avoid damaging electrical wiring when removing the door.
- Inspect the door frame before work
- Turn off power if near electrical wiring
- Be cautious with hidden cables or pipes
Preparing The Door
Removing a door from its hinges starts with good preparation. You need to clear the space and support the door safely.
Taking these steps helps avoid damage to the door and surrounding areas. It also makes the process easier and safer.
Clearing The Area
Clear the area around the door before you begin. Remove furniture, rugs, and any fragile items nearby.
- Move chairs and tables away from the door.
- Roll up rugs to prevent tripping.
- Keep pets and children out of the work zone.
- Lay down a drop cloth if needed to protect the floor.
Propping The Door
Support the door before removing the hinges. This prevents the door from falling and causing damage or injury.
| Tool | Use |
| Door wedge | Hold the door steady at the bottom edge |
| Stack of books | Support the door if a wedge is not available |
| Helper | Hold the door steady during hinge removal |
Credit: www.familyhandyman.com
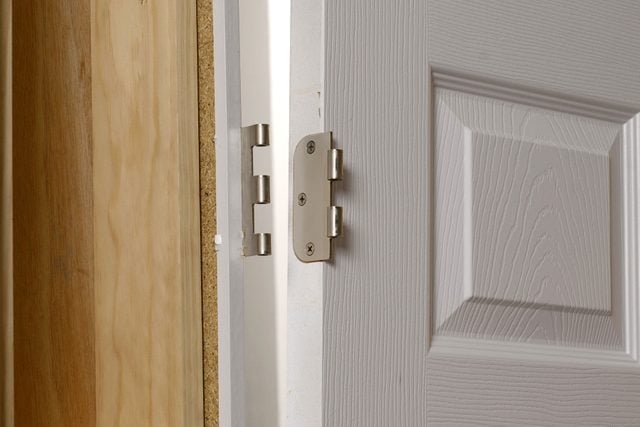
Removing The Hinge Pins
Taking a door off its hinges starts with removing the hinge pins. This task is simple if you know the right tools and steps.
We will cover how to identify the hinge type and use common tools to remove the pins safely.
Identifying The Hinge Type
Most doors use one of these three common hinge types: butt hinges, pivot hinges, or continuous hinges. Knowing the type helps you remove the pins correctly.
| Hinge Type | Description | Pin Location |
|---|---|---|
| Butt Hinge | Standard door hinge with two plates joined by a pin | Center of the hinge barrel |
| Pivot Hinge | Hinge that pivots at the top and bottom of the door | Pin at the pivot point, not removable |
| Continuous Hinge | Runs the full length of the door | Pin runs inside the entire hinge |
For most home doors, the butt hinge is the one with removable pins. Pivot and continuous hinges usually require different removal methods.
Using A Hammer And Screwdriver
To remove hinge pins from a butt hinge, you need a hammer and a flathead screwdriver. These tools help lift and tap the pins out carefully.
- Place the screwdriver tip under the bottom edge of the hinge pin.
- Tap the screwdriver gently with the hammer to loosen the pin.
- Keep tapping until the pin moves up enough to grab with your fingers or pliers.
- Pull the pin out completely from the hinge barrel.
Work on each hinge pin one at a time to avoid dropping the door. If pins are rusty, apply some lubricant before tapping.
Lifting The Door Off
Removing a door from its hinges can be simple with the right approach. Lifting the door off safely helps avoid damage to the door or frame.
Focus on teamwork and correct handling to make the process smooth and secure.
Working With A Partner
Having a partner makes lifting the door easier and safer. One person supports the top while the other holds the bottom. This balance prevents the door from tipping.
- Communicate clearly before you start lifting.
- Lift together at the same time.
- Keep the door steady as you remove it from the hinges.
- Place the door on a flat surface once removed.
Handling The Door Properly
Handle the door carefully to avoid scratches or dents. Support the door fully while moving it. Keep it vertical to reduce stress on the edges.
| Tip | Reason |
|---|---|
| Use gloves | Protects your hands and the door surface |
| Hold the sides firmly | Prevents slipping and falling |
| Move slowly and steadily | Reduces risk of damage and injury |
| Set door down gently | Keeps door and floor safe |
Troubleshooting Common Issues
Taking a door off its hinges can be tricky if problems arise. Some doors have stuck pins or heavy weight. These issues make removal difficult.
This guide covers two common problems. It helps you fix stuck hinge pins and manage heavy doors safely.
Stuck Hinge Pins
Hinge pins can get stuck from rust or dirt buildup. This stops the door from lifting off easily. You need to loosen the pins carefully to avoid damage.
- Spray a lubricant like WD-40 on the hinge pins.
- Let it sit for 10 minutes to penetrate rust and dirt.
- Tap the pin lightly with a hammer and nail punch or screwdriver.
- Try pulling the pin out by hand or with pliers once loose.
- If stuck, repeat spraying and tapping until the pin moves.
Heavy Doors
Heavy doors need extra care to avoid injury or damage. Using proper support and help is important. Follow safety steps when removing these doors.
| Tip | Description |
| Use a helper | Get a second person to support the door weight |
| Support with wedges | Place wooden wedges under the door to hold its weight |
| Lift slowly | Raise the door carefully to avoid dropping or sudden moves |
| Wear gloves | Protect your hands from splinters and sharp edges |
Reattaching The Door
Reattaching a door after removing it from its hinges is simple. You need to place the door back correctly to fit the frame well.
Careful alignment and securing the hinge pins are the key steps to ensure the door opens and closes smoothly.
Aligning Hinges
Start by holding the door close to the frame. Line up the hinges on the door with the hinges on the frame.
Make sure the hinge leaves fit exactly into their matching parts on the door and frame. Proper alignment prevents the door from sticking.
- Hold the door steady while aligning hinges
- Check that all hinge holes match
- Adjust the door position slightly if needed
- Ensure the door is level with the frame
Securing Hinge Pins
Once the hinges are aligned, insert the hinge pins back into place. These pins hold the door and frame hinges together.
Push the pins down firmly until they sit fully in the hinge. You can tap them lightly with a hammer if needed.
- Insert each pin straight into the hinge barrel
- Tap pins gently if they do not slide in easily
- Make sure pins are flush with the hinge top
- Check the door swings smoothly after pin insertion

Credit: www.reddit.com
Frequently Asked Questions
How Do I Safely Remove A Door From Its Hinges?
Start by closing the door and placing a wedge under it. Use a hammer and nail punch to tap out hinge pins. Lift the door off carefully, supporting its weight to avoid damage or injury.
What Tools Are Needed To Take A Door Off Hinges?
You mainly need a hammer, a nail punch or screwdriver, and a door wedge. These tools help you remove hinge pins and support the door during removal. Having a helper can make the process easier and safer.
Can I Remove A Door Without Removing The Hinge Pins?
No, removing hinge pins is essential. They secure the door to the frame. Without taking out the pins, the door won’t detach from the hinges safely or properly.
How Do I Prevent Door Damage When Removing It?
Support the door’s weight during removal to avoid dropping it. Use a wedge to keep the door stable. Handle the door gently to prevent scratches or dents on its surface or the frame.
Conclusion
Removing a door from its hinges is easier than it seems. Follow the steps carefully and take your time. Use basic tools and stay safe while working. Check each hinge pin and lift the door gently. Practice makes the process smoother and quicker.
With patience, anyone can do this task successfully. Keep these tips in mind for your next door project.

