

Are you ready to upgrade your cabinets with a sleek, modern touch? Installing European hinges can transform your furniture, giving it a clean look and smooth function.
These hinges are hidden from view, making your cabinets look neat and stylish. But if you’ve never installed them before, it might seem tricky. Don’t worry—this guide will walk you through every step, making the process simple and stress-free. By the end, you’ll have the confidence to handle the job yourself and enjoy the professional finish you deserve.
Let’s get started!
Choosing The Right European Hinges
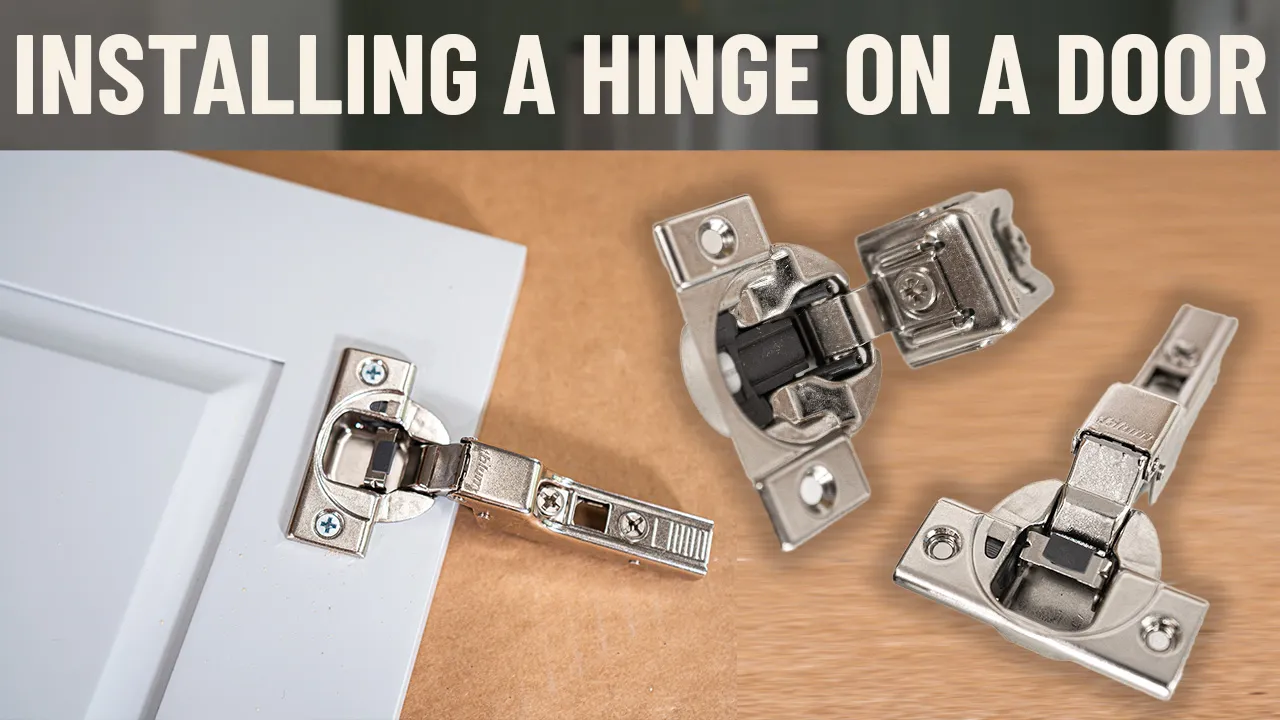
European hinges are popular for cabinet doors. They offer a clean look and smooth movement.
Choosing the right hinge helps your cabinet work well and last longer. Consider different types, sizes, and finishes.
Types Of European Hinges
There are several types of European hinges. Each type fits different door styles and functions.
- Full overlay hinges cover the cabinet frame fully
- Half overlay hinges share space with another door
- Inset hinges fit doors flush inside the frame
- Corner hinges are for doors that open at 90 degrees
- Soft-close hinges prevent doors from slamming
Size And Overlay Considerations
Hinges come in various sizes. The size must match the door and cabinet thickness.
Overlay means how much the door covers the cabinet edge. Choose overlay based on door type.
- Full overlay: door covers most of the cabinet side
- Half overlay: door covers part of the cabinet side
- Inset: door sits inside the cabinet frame
Material And Finish Options
European hinges come in different materials and finishes. These affect durability and look.
Common materials include steel and stainless steel. Finishes can be nickel, chrome, or brass.
- Steel is strong and cost-effective
- Stainless steel resists rust and corrosion
- Nickel finish offers a shiny, modern look
- Chrome finish is bright and easy to clean
- Brass finish gives a classic, warm appearance
Tools And Materials Needed
Installing European hinges needs the right tools and materials. This helps you fit the hinges safely and correctly.
Before starting, gather all the tools and prepare your workspace. This saves time and avoids mistakes.
Essential Tools For Installation
You need some basic tools to install European hinges. These tools help you drill holes and fix the hinges properly.
- Drill with drill bits (usually 35mm for hinge cup)
- Screwdriver (Phillips or flathead)
- Measuring tape or ruler
- Marking pencil or awl
- Chisel (optional for fine adjustments)
- Clamp (to hold doors steady)
- Level (to check door alignment)
Preparing Your Workspace
Clear your workspace before installing hinges. A clean area helps you work faster and safer.
Make sure you have good light and enough space. Lay the doors flat on a soft surface to avoid scratches.
- Remove items from the workbench
- Use a soft cloth or foam to protect doors
- Keep tools within reach
- Check lighting for clear visibility
- Wear safety glasses to protect eyes
Preparing The Cabinet Door
Preparing the cabinet door correctly is key for installing European hinges. This ensures a strong hold and smooth door movement.
Focus on marking hinge positions carefully and drilling the cup holes accurately for best results.
Marking Hinge Positions
Marking where the hinges will go helps you drill in the right spots. Measure and mark all points before drilling.
- Measure from the top edge of the door down about 3 inches for the top hinge.
- Mark the same distance from the bottom edge for the bottom hinge.
- For doors wider than 24 inches, add a middle hinge centered between top and bottom marks.
- Use a pencil and ruler to make clear, small marks on the door surface.
Drilling Cup Holes
Drill the cup holes where you marked for the hinge cups. Use a drill bit made for hinge cups, typically 35mm in diameter.
| Tool Needed | Details |
|---|---|
| 35mm Forstner Bit | Makes clean, flat-bottomed holes for hinge cups |
| Drill Guide | Keeps drill steady and accurate |
| Measuring Tape | Ensures correct hole placement |
| Pencil | Used for marking drill spots |
Drill the holes to a depth of about 12-13mm. Stop drilling before going through the door.

Credit: www.amazon.com
Attaching Hinges To The Door
Installing European hinges requires careful attachment to the door. Proper placement helps the door open smoothly and last longer.
This guide explains how to attach the hinges securely and check their alignment for the best fit.
Securing The Hinge Cups
Start by placing the hinge cups into the pre-drilled holes on the door. Make sure they fit snugly without gaps.
Use screws to fasten the hinge cups tightly. Do not overtighten, or you might damage the wood or the hinge.
- Align the hinge cup flush with the door surface
- Insert screws into the screw holes on the hinge cup
- Tighten screws evenly to hold the cup firmly
- Check that the hinge cup does not move or wobble
Checking Hinge Alignment
After securing the hinge cups, check if the hinges line up correctly. Proper alignment prevents door binding and ensures smooth operation.
Look at the hinge placement from different angles. Make small adjustments if needed before fully tightening the screws.
- Close the door gently to test the fit
- Look for even gaps between the door and frame
- Adjust the hinge screws to correct any misalignment
- Confirm the door opens and closes smoothly
Mounting The Door To The Cabinet Frame
Mounting a door with European hinges is a common task in cabinet making. It ensures the door fits well and works smoothly. This guide covers how to align the door and screw the hinges to the cabinet frame.
Careful alignment and secure screwing are key to a lasting installation. Follow the steps below to mount your door correctly.
Aligning The Door
Start by holding the door in place on the cabinet frame. Check that the door is level and the gaps around it are even. Adjust the door position before attaching the hinges.
- Place the door on the cabinet frame, aligning the edges.
- Use a level to ensure the door is straight.
- Check the gap between the door and cabinet on all sides.
- Adjust the door until the gaps are equal and consistent.
- Hold the door firmly to prevent movement during installation.
Screwing Hinges To The Frame
Once the door is aligned, attach the hinges to the cabinet frame. Use the right screws and tools to ensure a secure fit. Tighten screws evenly to avoid misalignment.
| Tool | Purpose | Tip |
|---|---|---|
| Electric screwdriver | Drive screws quickly and firmly | Use a low torque setting to avoid damage |
| Level | Check door alignment | Use after screwing to confirm position |
| Measuring tape | Measure gaps and hinge placement | Double-check measurements before screwing |
- Hold the door in the aligned position.
- Mark the screw holes on the cabinet frame.
- Pre-drill holes if needed to prevent wood splitting.
- Attach the hinges using screws and a screwdriver.
- Tighten screws evenly and check door movement.
- Adjust screws slightly if the door does not close properly.
Adjusting For Perfect Fit
European hinges let you adjust cabinet doors easily. Proper adjustment makes doors look good and work well.
We will look at how to adjust the hinge for the best fit and smooth operation.
Lateral And Depth Adjustments
Lateral adjustment moves the door left or right. Depth adjustment moves the door closer or farther from the cabinet.
These changes help align the door with the cabinet frame perfectly.
- Use the lateral screw to slide the door side to side.
- Turn the depth screw to move the door in or out.
- Make small changes and check the fit after each turn.
Height Adjustments
Height adjustment moves the door up or down. This helps line the door edges evenly with the cabinet.
You adjust height by loosening screws on the hinge plate. Slide the door up or down, then tighten the screws.
- Loosen the mounting plate screws slightly.
- Move the door up or down to the desired position.
- Tighten the screws firmly to hold the door in place.
Ensuring Smooth Operation
Check that the door opens and closes easily after adjusting. The hinge should work without noise or resistance.
Lubricate the hinge joints if needed. Tighten all screws to keep the door stable and smooth.
- Open and close the door several times.
- Listen for any squeaks or resistance.
- Add a drop of lubricant if the movement is stiff.
- Make sure all screws are tight but not over-tightened.
Troubleshooting Common Issues
Installing European hinges can sometimes lead to common problems. This guide will help you fix these issues easily.
We will focus on door misalignment, loose hinges, and uneven gaps. These are typical challenges when installing hinges.
Door Misalignment
Door misalignment happens when the door does not close properly. This issue can make the door appear crooked.
You can adjust the screws on the hinges to fix this. Turn the screws slightly until the door lines up correctly.
Loose Hinges
Loose hinges cause the door to wobble. This can make opening and closing the door difficult.
Tighten the screws to secure the hinges. If the screws do not hold, consider using larger screws or wood filler.
- Check the screw size
- Use wood filler if holes are too large
- Reinsert screws carefully
Uneven Gaps
Uneven gaps between the door and frame are common. They can make the door look unattractive and affect its function.
Adjust the hinge screws to even out the gaps. Small adjustments can make a big difference.
| Problem | Solution |
| Top gap too wide | Lower top hinge |
| Bottom gap too wide | Raise bottom hinge |

Credit: www.youtube.com
Maintaining European Hinges
European hinges are popular for their sleek design and functionality. Proper maintenance ensures they last longer and work smoothly.
This guide covers essential tips for keeping your European hinges in top condition. Follow these steps regularly to ensure optimal performance.
Regular Cleaning
Keeping your hinges clean prevents dirt and grime from causing wear and tear. A clean hinge operates smoothly and quietly.
- Use a damp cloth to wipe off dust and dirt.
- Avoid abrasive cleaners that can damage the finish.
- Clean the hinges every few months for best results.
Lubrication Tips
Lubricating your hinges reduces friction and prevents squeaking. Use the right products to ensure long-lasting performance.
Apply a few drops of lubricant on the moving parts.
Avoid over-lubricating to prevent oil buildup.
Wipe away any excess lubricant with a soft cloth.
| Lubricant Type | Application Frequency |
| Silicone Spray | Every 6 months |
| Graphite Powder | Yearly |

Credit: www.amazon.com
Frequently Asked Questions
What Tools Are Needed For Installing European Hinges?
You need a drill, screwdriver, measuring tape, pencil, and European hinge jig for precise installation. These tools help ensure accurate hinge placement and secure attachment to cabinets.
How Do I Align European Hinges Correctly?
Measure and mark hinge positions on the cabinet and door. Use a jig for drilling holes to guarantee proper alignment and smooth door operation.
Can European Hinges Be Installed On All Cabinet Types?
European hinges work best on frameless cabinets but can fit framed ones with adjustments. They offer clean looks and concealed hardware for various cabinet styles.
What Is The Average Installation Time For European Hinges?
Installing European hinges typically takes 15 to 30 minutes per door. Time varies based on skill level and number of hinges used.
Conclusion
Installing European hinges can improve your cabinet’s look and function. These hinges allow smooth door movement and easy adjustments. Take your time to measure and align correctly. Using the right tools makes the process simple and fast. With patience, your cabinets will open and close perfectly.
This small upgrade adds value and convenience to your home. Try it yourself and enjoy better cabinet doors every day.

